Saturday, February 28, 2015

March Goals

Meat: Corned Beef & Ham Other: Moving
Back to my monthly goal setting. Usually I set my prep goals to pressure canning meat & something else.
1) With St. Patrick's Day in March I will be at least purchasing some corned beef briskets for canning which will be on sale. The hams will also be on sale towards the end of the month, so I will also be buying some hams.
2) Get all of our storage moved over to the new house. Well, along with moving everything else.3) Continue to establish a logical storage system in our new location. Previously we had several fairly large spaces dedicated to storage. I am going to have to be more creative with my storage, since we are losing about 700 square feet.4) Hopefully, I will be able to start canning meat again by the end of the month.

Do you have anything planned for March?

Friday, February 27, 2015

DIY Cute Little Chicken Coops or "Canning Chicken"

This is "Spirit" & she is a "Hennie"
"Hennies are sweet chickens with gentle dispositions, fresh from the brooder, and eagerly awaiting you to adopt" & they were hatched (created) by a wonderfully creative mom from Born Imaginative. She hand makes these cuties and sells them on etsy. I've been watching and thinking about these little peeps.
One of my biggest dreams is to have my grandbabies become excited about farm life with us. Passing on skills for their future; having them revel in the good life. 
So, I hatched this little gift idea to present to them on Easter. 


I got three little hennies, which come with "origami nesting box (from paper bags), wool hay and a wooden egg. They also come with a birth certificate detailing their date of birth, their breed and the unique and special details specific to their breed. " from Jackie's Esty site.
I picked up some edible grass & jelly bellies from Target. 


I made a little nest from the edible grass, tucked in some jelly beans, the wooden egg & their birth certificates into a canning jar. Then I nested each little hennie inside and added a lid and ring to finish off their new coop.
On Easter each child will receive their hennie & coop, plus the original origami nesting box and an additional certificate that will entitled them to each name one of the chickens on gramma's farm!
I did have to adjust the peeps to face the other way. Here are "Spunk & Cheer".


Very Important Tip: Make sure you don't put the lids on too tightly, because the hennies need to be able to breathe. (1127)


What in the world does this dress have to do with preparing?

First the question is: Is this dress white & gold or blue & black? I see a gold & white dress. Some will agree, others will swear it's black & blue. 


Credit: Courtesy of Caitlin

It's all about perception. I think we in the preparedness community often get caught up in various polarizing camps. When in reality we need to try to remind ourselves that simply being prepared is the higher goal.
None of us really know for certain if a catastrophic event occurs, what that event will be. But if we unify on being prepared to the best of our abilities, then we all win to a degree.
Now, don't get me wrong. There are sites I will not follow (support). Sites that are click-through (cannibalizing others work only to generate advertising profit for themselves), or fear mongering sites and hatred based sites (either way). For me, I do tend to listen to people who are actually doing the work & share their results. That tends to lead to more credible information. But, I still use my own brain and research to determine if it is correct for my family.
We can disagree about certain things, yet still work together for the greater good. 
I'll go back to my original premise, none of us have cornered the market on what actually will happen in the future. But, we will all gain if we work together more for the common goal of being a community of people what work towards being better prepared.
Join us as we work together. 

P.S. One interesting note, while this post on my facebook page garnered WAY more notice than the previous post an hour before of storage solutions; more people focused on the part about the dress, than the observation on being prepared. What are we doing to ourselves? 

The Science of Why No One Agrees on the Color of this Dress (wired.com)
I would love it if you joined our community on Facebook. Perky Prepping Gramma   BTW, the dress is really blue & black.

Thursday, February 26, 2015

How to Create Storage Solutions (part 1)

These storage solutions are ideas that we are actually implementing, which I am hoping to share with you as we go. Thankfully we have the advantage of taking our time in moving to our new home, since we don't have two mortgages. In this process we are slowly building in storage solutions that specifically work in our space. Hopefully they will give you ideas that you are able to use in your home.

First we took picture of every available space we could think of to add storage. I am sort of using these photos as a draft blueprint when planning the storage solutions.

Example 1: Closet(s)
This is a photo of one of the closets, then we measured the usable space.


Based on those measurements, we started out purchasing two of these Seville shelving units that would fit the space (associates link).


The disadvantage I first discovered with commercial shelving units were that there was too much unused space for our intended purpose; because most units only have 3 or 4 shelves or you wind up stacking things haphazardly in the attempt to use the space up. We found that is was less expensive to use two shelving units to create “one unit” for our space than purchasing and adding additional individual shelves.
This unit was built specifically to store quart jars on the shelves. Mr. Perky actually used a jar to adjust the height of each shelf. Then added additional shelves as needed. 

(half way built)

The only disadvantage is we now have extra poles; but I am sure we will eventually find a way to use the left over poles for another purpose.
These Seville Shelving units have proved to be really easy to put together, hold a lot of storage weight (read in the product description) and extremely sturdy. We have been using them for several years now and I highly recommend them.
As we get further along in the process I will update you on the progress.

Now that we have the first shelf in place, we will be moving jars into this shelf and pulling the three shelves we already have built in our current home (below) to start filling in the space. We will be readjusting the height of the incoming shelves based on what we are storing.


TIPS
1) See the left shelf: If you are storing bottles of water, I adjusted the bottom shelf to allow space for the bottles. It allowed me to have less weight on the shelves. This shelving unit was created to store 1/2 gallon vacuum sealed products. 
2) We filled in the corners with boxes from what I consider to be one of the best kept secrets in food storage, the lds.store.
3) The unit on the right was also built with two Seville shelving units to fit pint jars.

4)Mr. Perky got ahead of me on this project and went ahead and built the shelves right side up. The next unit will be built with the shelves “upside down” so that an edge will be created on each shelf to better help keep the jars more firmly in place.

Example 2: Kitchen
Since most of the cabinets are adjustable in the kitchen cabinets, the plan is to actually place the items in their appropriate spots and adjust the shelves to minimize the space used. Then we will add an additional shelf to each cabinet.


TIP: Remember we will need to be cautious about how much weight we add to these built in cabinets. The plan is to only store lighter weight objects on the additional shelf we add.

Example 3: Water Storage
While this is in our current abode, I had to laugh. We have a boarder who is in our home all the time. After three years, last night was the first time she actually looked and asked what was the t.v. sitting on. LOL.
When we move the inside water storage barrels to our new home, we will probably still use it as our t.v. stand. Though I think we may add a simple wood structure around it to disguise it even more. We personal use the Augason Farms Emergency Water Storage Kit (at posting currently $95.14, plus free shipping) which we purchased from Walmart.com, because it was far more cost effective than Amazon.


This is just the beginning. I would love for you to share ideas that you have actually used to store your items. We are all in this together. You never know when one persons tip will would the perfect solution for someone else. 


I participate in the Amazon Associate program, where I receive a small % commission for linking products that I recommend. I only recommend products I personally used and like. Your support is very appreciated, anything you choose to purchase through my link, is helping me to be able to share more things that I do with you. Perky Gramma Teaches Amazon link.

Currently Reading: Apocalypse Law (Vol. 3)

Monday, February 16, 2015

12 Natural Remedies for Cold & Flu Symptoms

Have you been battling a cold or flu recently? It is certainly that time of year. Before running to the pharmacy, try some of these natural remedies to relieve your symptoms. 


1) Blow your nose properly. One side at a time.

2) Wash your hands

3) Drink plenty of fluids: Warm drinks helps relieve congestion and helps with hydration

4) Elderberry Syrup: I start taking this when I am exposed to someone with a cold. It is easy to make and certainly works for me. Usually I add some ginger.


Back Row: Elderberry Juice, Water Kefirs (mango & strawberry)
Front Row: Blue Berry Juice, Candied Ginger, 2 Go-Go Juices

"Elderberries contain natural substances called flavonoids. They seem to help reduce swelling, fight inflammation, and boost the immune system.
Studies have found that elderberry eases flu symptoms like fever, headache, sore throat, fatigue, cough, and body aches. The benefits seem to be greatest when started within 24 to 48 hours after the symptoms begin. One study found that elderberry could cut the duration of flu symptoms by more than 50%.
Lab studies have found that elderberry might be effective against H1N1, or swine flu." (Web M.D.)
5) Ginger Tea: Clears out those sinuses. I also keep some candied ginger on hand too.

6) Gargle: Try a teaspoon of salt dissolved in warm water, four times daily. "To reduce the tickle in your throat, try an astringent gargle - such as tea that contains tannin - to tighten the membranes. Or use a thick, viscous gargle made with honey or a mixture of honey and apple cider vinegar, a popular folk remedy. Steep one tablespoon of raspberry leaves or lemon juice in two cups of hot water and mix in one teaspoon of honey. Let the mixture cool to room temperature before gargling." (from Web M.D.)

7) Cold or Hot packs on your congested sinuses: Wet a washcloth, warm it up in the microwave for about 50 seconds. Test the heat. Or cold may make it feel better, bag of frozen veggies.

8) DIY Nasal Saline Solution: I have been using this for years now at the first sign of a sinus infection or to clear out my sinuses. Findings show that if saline irrigation is used regularly, it can help to thin mucus, decrease postnasal drip, and cleanse your nasal passages of bacteria. The two main ways to use saline irrigation are with a Neti pot or small squirt bottle.
How To: In a clean container, mix 3 heaping teaspoons of iodide-free salt with 1 rounded teaspoon of baking soda and store in a small airtight container. Add 1 teaspoon of the mixture to 8 ounces (1 cup) of lukewarm distilled or boiled water.
Use less dry ingredients to make a weaker solution if burning or stinging is experienced. For children, use a half-teaspoon with 4 ounces of water. (Web M.D.)


If you get the Neil Med Sinus Kit, get the smallest one and make your own saline solution.
9) Take a steamy shower

10) Add Peppermint essential oil in the shower. Helps with the drainage of your nasal passages.


11) Rest: You know this, so put it into action, or inaction.

12) Other helpful foods:
  • Vitamin C-containing foods like bell peppers
  • Blueberries curb diarrhea and are high in natural aspirin, which may lower fevers and help with aches and pains
  • Carrots, which contain beta-carotene
  • Chili peppers may open sinuses, and help break up mucus in the lungs
  • Cranberries may help prevent bacteria from sticking to cells lining the bladder and urinary tract
  • Mustard or horseradish may helps break up mucus in air passages
  • Onions contain phytochemicals purported to help the body clear bronchitis and other infections
  • Black and green tea contain catechin, a phytochemical purported to have natural antibiotic and anti-diarrhea effects. (Web M.D.)
TIP: I also find that blueberry juice energizes me. I mix elderberry syrup & blueberry juice and call it Go-Go Juice.


Saturday, February 14, 2015

Showing off my new aprons...

Here I am in all my fluffy glory at work in one of my new aprons. I have recently been on an apron kick. Decided to spend my Christmas $$$ on all these aprons.
First in the line up are two aprons from Ikea. One pink floral, the other red. They are long and roomy, please note how the strap and string are one piece, making it more adjustable.


The first apron I purchased was handcrafted from Yoder's Market. While it is nice, after getting it I realized really quickly I wanted a lot more practical apron. I may give this one away...


I really wanted a cherry print apron, probably spent too much on this apron. But, great if you want something cutesy. Then believe it or not, Mr. Perky knew I was on this kick and he decided to buy this other cherry print apron. He certainly surprised me this on Valentines Day. 


The last two aprons are really my favorites. They are made by hand, by small businesses. I really love to support small businesses. Plus, they are very reasonably priced, especially since they are handmade.

First, there is this really sweet apron which I love from Farmgirl Treasures (482). They are just the sweetest seven sisters, who love to sew. I have fallen in love with them.


The nice things is, you are able to contact them on their etsy shop for custom orders. I also got a handwritten recipe from them. They do aprons, skirts, slip etc. Oh, and sweet doll clothes (think American Girl)...


The last of my aprons aren't here yet. I caught a sale on a bundle of this type of apron jumper at Katie's Mercantile (718). Again, these are made by hand, reasonably priced and they are a small business. I had already planned to purchase something like this & I got lucky.
I have purchased several other items I can't wait to show you when they arrive. Their store: 
Katie's Mercantile.


There you have it, the apron fashion show. My Christmas money is gone & I am as happy as can be. I believe I have enough aprons to last me forever.(173)
~Please, feel free to share a picture of your apron(s) on my Facebook page. I think everyone would get a kick out of the virtual apron fashion show. ~


Thursday, February 12, 2015

DIY: How To Make Wine (part 2)

We are having our homemade blueberry wine for dinner tonight. The two weeks of  fermentation time has passed & it is time to bottle our home brew.


I made two small batches, one with honey, the other with raw organic sugar. After the fermentation process, I found very little difference in the final taste.
So I gathered my siphoning equipment: the fermented juice, swing top bottle & food grade tubing.


It's is fairly important to actually siphon the wine out of the original container, this eliminates the sediment that has settled in the bottom for the jars. See the sediment in the bottom of my container?


Actually I was amazed at how simple this was to make the wine. The skill level necessary is very basic. Obviously, you are able to apply this DIY wine making process to other fruits, I just happened to have some nice blueberries to work with. The wine tastes fine and is dry. 
I are going to experiment with this process more.
Chalk up another skill learned! 

I currently have access to a lot of fruit that would make great wine at this time and plan on growing more soon.
What I need to increase is my storage of yeast. Currently we have only three pounds of yeast stored in the freezer.
This is the blog post on the first steps of making the wine: DIY: How To Make Blueberry Wine

Amazon Associate Links:


I participate in the Amazon Associate program, where I receive a small % commission for linking products that I recommend. I only recommend products I personally used and like. Your support is very appreciated, anything you choose to purchase through my link, is helping me to be able to share more things that I do with you. Perky Gramma Teaches Amazon link.


How To Pressure Can Chicken + 12 Nifty Tips I Have Learned

After about 6 months of preparing, I realized I needed to learn about canning. Being a newbie, I fast realized there were so many things I didn't know to ask. Like, what is finger tight, what is a jiggle...
With that in mind, I want to share some of those "secrets" with you.


GETTING READY
If I am able, I try to get as much clean and ready ahead of time. 


Washing my jars. 
TIP: I often put my rings in a mesh zippered bag so they don't fly all over the place in the dish washer. I don't put my new lids in the dishwasher.
To find the mesh bags:
 (associates link)


I always hand wash
 my lids with warm water and soap, then rinse well.
TIP: ALWAYS use new lids for pressure canning. You may use those "used" lids for everyday purposes like vacuum sealing, storing in fridge & opened jars.


Start gathering the equipment for canning.
Vinegar, my paper towels are close by, clean rings.
My timer, the weight for my canner, which is kept in this red bag in the following picture.

TIPS: I have this little bag, that I keep all my canning utensils, manual, etc., during canning. Things that I use for canning. I have a little "S" hook to hang it on my metal shelf in my kitchen. I also have extra sets of the utensils in here. Remember "two is one, one is none".
When it is not in use, I store it inside my pressure canner.
Also Mr. Perky came up with the idea of putting clean rings on an old paper towel holder. It is very convenient.


I grab several clean dishtowels & a new dish cloth. I have my washed & sterilized utensils out and my canning manual.
I also have started using these simple dark colored placements to sit my hot jars on when processing. There were about a dollar (I think I got them at Walmart). New dishcloths are not cheap, so this was a good alternative.
For people who are preparing, I have three sets of canning utensils.
1) In case they break or wear out. (two is one and one is none)
2) I also have found it handy if I drop a utensil or it gets contaminated, I don't have to stop everything and wash and sterilize them again.
You can get the utensil sets on Amazon


Gather everything & get set up. You should have your pressure canner, utensils, vinegar, paper towels (or clean cloth), clean dish towels, wash cloth, timer, jars, lids and rings. Oh & your chicken...
I talk often about Zaycon chicken, I honestly believe it is the best deal going. you may find  better price, BUT, their quality is beyond belief. I mean, look at the size of this chicken breast.
I have other posts about Zaycon here, if you want to learn. Or just click here on the referral link (no obligation to buy) Referral Link for Zaycon Chicken


Get your pots ready.

Interesting the National Center for HomeFood Preservation statesEmpty jars used for vegetables, meats, and fruits to be processed in a pressure canner need not be presterilized. It is also unnecessary to presterilize jars for fruits, tomatoes, and pickled or fermented foods that will be processed 10 minutes or longer in a boiling-water canner."  I started implementing this recently. 

Pressure Canner: Please NOTE you MUST use a pressure canner when canning meat.
Check the vent hole on the lid of your canner. Make sure you can actually see light through it. If not, you can clean it with a pipe cleaner, or simply blow air through it.


TIP: Run your finger gently around the rim of the jar checking for nicks. It it is nicked, throw that jar away.


The sink...I wash my sink, then clean it with vinegar.


Wash your hands, well & often! This is raw chicken we are dealing with.


TIP: You actually are able to write on the lids with sharpie, before or after you wash them and the writing will stay on.


The Ball canning Jar Company has recently been talking about changes in processing their lids by NOT simmering you lids

EDITED: With all new Ball canning lids, you no longer have to boil them & sterilize them. Just wash them well with soap and water. I personally still keep a small pan going with simmering water in case I accidentally drop a lid or it touches the meat when I am putting the lid on. It does happen. This way I don't have to stop and rewash what has been contaminated. 


Wash your chicken and start cutting.
First you trip off the excess fat, then cut into 6" chunks. 

TIP: Note the lines on the edge of the cutting board. I have marked it with a sharpie at 6” increments. I use that as a guide to cut my meat into chucks that will easily fit in the pint sized jars.


Reserve the fat scraps.


Then start adding the meat to the canning jars. Add a big chunk first. Then smaller pieces.
I also have smaller pieces (on the left) that I am able to slice up into slices to fill in extra spaces at the top.
You can either add salt to the bottom of the jar, or not. I prefer not to, since it turns out to salty for my taste.


While it is not needed; when processing chicken I prefer to add boiling water at this point, It helps create a little broth, which I like. I never have enough broth it seems.


Use a spatula or the green magnet/bubble popper, to release trapped air bubbles & allow the water to get inside the jar completely. Add more water if needed.


Do not fill over this line on the jar. (Last thread on the screw top) This is called "headspace".
What is headspace?
The unfilled space in a canning jar between the top of the food or liquid and the underside of the lid. The corrrect amount of headspace is essential to allow for food expansion as the jars are heated and for the formation of a strong vacuum seal as the jars cool.


If you fill it too full, use a spoon to scoop out the excess.


Wipe the rims of the jars with a towel and white vinegar. The rims of the jars must be VERY clean.


Place a lid and then a ring on each jar. If your lid touches the meat, wash that one again, or use a spare.


Tighten the ring to "finger tight". It just barely tight.
How tight is finger(tip) tight?
Use your fingers to screw band (ring) down until resistance is met, then increase to fingertip tight.
Do not use utensil or the full force of your hand to over-tighten bands (rings).
Tightening a lid beyond this point could cause the lid or band to buckle during processing, and is therefore undesirable.


Back to those fat scraps. I save them up and fill a another jar about half way full with scraps and then add water. This gives me a few jars of nice broth (did I mention I never have enough both) to open up when I want to make chicken and dumplings. This last weekend I made 3 quart jars of broth.


Next, fill your canner with the required amount of water. My Presto, actually has a fill line, which is helpful.


Add your jars to the canner.
Yes, 8 wide mouth jars will fit.


Pressure Canning the chicken. O.k. Here is the part some people find scary. It will be o.k. Just follow the instructions.
Now, put your pressure canner lid on & turn up the heat to high. Stay with me here...


I set my timer to 10 minutes...
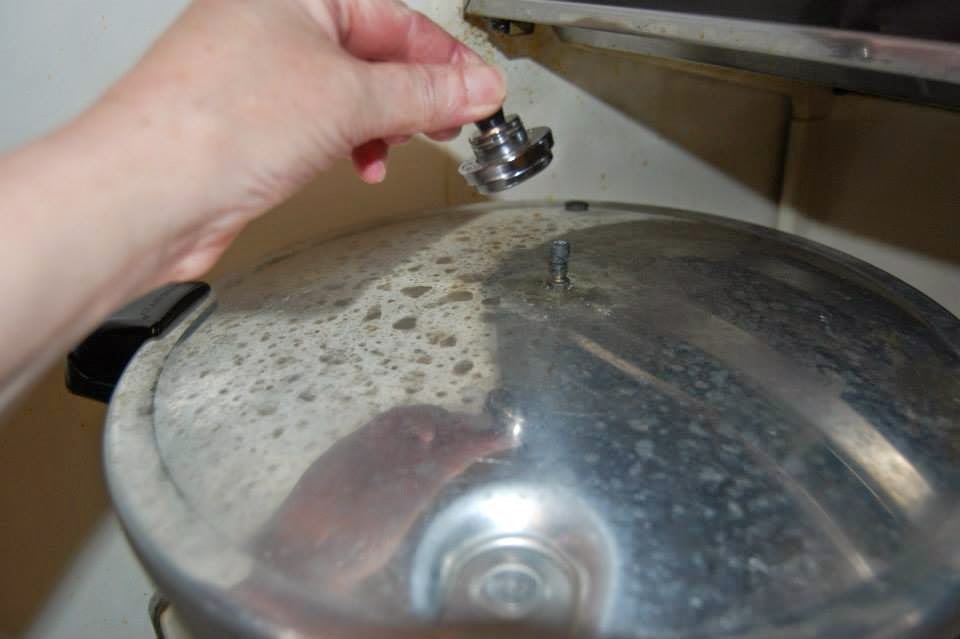


WHEN there is a steady stream of steam coming out of the vent hole on top (see the steam?)...


Then you start the timer. You want that steady stream of steam venting for 10 minutes.


If it sounds like it is going crazy inside the canner, you may reduce the heat. But DO NOT let that steady stream stop. This isn't dangerous, just if the stream of steam stops, you will need to start the timer over. Steady stream of steam for 10 minutes. Got it?
Make sure you are monitoring these stages,

When the 10 minutes are up, then you add the weighted gauge. Bring the temperature back up, until the weight starts to jiggle, spew or spit.


When that happens, set your timer for 75 minutes for pints (90 minutes for quarts) & start the timer. Then you reduce your heat, until the weight only spits, spews or jiggles 3-5 times a minute. This takes practice. But just sit there and lower your heat until this happens.
If you are using just a pressure gauge, you want to continuously maintain 10 or 11 lbs. of pressure through out the 75 minutes.


After you have done this awhile and you get to know our canner and stove; you will know just where to drop the temperature on your stove to maintain the proper pressure.


What to do while you are waiting for 75 minutes. Read a book, do a little dance, wash dishes, unload the dishwasher (mine is always full it seems)


Clean your counter really well. Remember you have just had chicken juice all over it.


When the timer goes off: turn off the heat and gently move the canner from the heat.
DO NOT REMOVE WEIGHT, GAUGE OR LID.


Let rest until the pressure gauge drops down or when the little button drops down. That tells you that all the pressure has been release and it is safe to remove the lid. Only then can you remove the weight.
I pay attention, because as soon as the button drops
I want to remove the jars to keep them from cooking even more.


Remove the weight & then remove the lid carefully, turning it away from you when removing the lid to avoid the steam burning you. It will still be very hot. TIP: I use a dish towel to better protect me from the steam escaping.


Then gently remove your jars with your jar lifter...


And set them on a dish towel or place mat to cool.
Then SMILE! when you hear those lovely "pings" as your jars start to seal.
Most canners will tell you that this is their favorite part.


I pour out the water from my canner and allow it too cool down. Then wash it to have it ready for the next time.


For some reason, this is my second favorite part of canning. You place a clean dish towel(s) around the jars to protect them from drafts. Some may not need to do this step, but it was what I learned and I feel sometimes my house is a little drafty.
I feel like I am tucking babies in for the night.
Check them every now and then to insure all the jars have sealed, by seeing the the button has popped in. If a jar hasn't sealed, then let it cool down and put it in your fridge and use it sometime this week.
That is it for today. Unless you have several loads to can. Now you let them cool down and rest for the night.


But, this isn't the last step. 
You put a lot of work, time and money into pressure canning food. When you are done canning, you just put the jars on the shelf, right? WRONG! I often say "there are questions that newbies don't even know to ask". I don't believe I have seen a list of the simple, yet very important steps to take AFTER you finish a batch to optimize and protect your hard work.  This post tells you what to do next: 
Testing 1, 2, 3...


  Proud new member of the Homestead Bloggers Network.
Featured at the Homestead Bloggers Network
If you enjoyed this post, feel free to join our community Perky Prepping 
Gramma on FaceBook


This allows me to show you the products I have personally used and endorse, while monetizing my work. What I found early on was people would ask me where I got such & such an item and I would simply share a link. 
Even on regular Amazon (not prime), on specific items, when your order reaches a certain point, I believe it's $35 the shipping to home is free. So, i created a store of these items I use frequently or recommend. It doesn't cost you anything extra, but I do receive a small percentage as an advertising bonus, if you purchase from my store. You are even able to just link in and do any of your regular Amazon shopping. I really appreciate the support. (425)