Thursday, November 28, 2013

Sweet Potato Extravaganza...

This is the recipe I use to make my sweet potato pies...
I double the recipe. Then do it multiple times. As you can tell, I have used this for MANY years. I only use a recipe for the actual directions for the first time or two. Then I start adapting.
I actually make it by taste mostly.
Now remember, one year go, I was really a big time newbie at storage.


There is going to  be a lot of “how to's” & tips through out this article & at the end so keep reading. Check them all out. Most everything I do can be found on my blog site "Perky Prepping Gramma" or in the photo albums on my Facebook page.


I stored all the ingredients to make my pies.
Large cans of Bruce's sweet potatoes (12 large cans)
Brown sugar (8 lbs)
Eggs (ongoing storage)
Butter (10 lbs. stored in March)
Molasses (3 jars)
Spices - All have multiple containers, since I tend to use these spices a lot. (cinnamon, ginger, cloves, plus I add allspice. I no longer use nutmeg or the almond extract)
Milk (ongoing storage)

My ginormous bowl has gone missing. I have no clue where it went. So I used the next largest.
First I open the cans of sweet potatoes and drain them.
Then just add the ingredients.
Brown sugar
 Eggs: Since I store them I always open them in a seperate conainer and smell. Just to make sure they are still good.
 Butter
 Milk
 Molasses & spices...
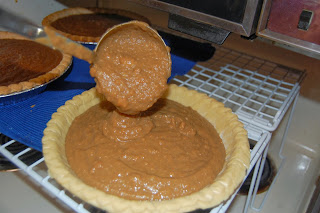
Since this is really sweet potatoes, the mixture is lumpy. It is a very different consistency than using pumpkin puree in a can.
Well, my first set of pies are done (on the left), the second batch is in the oven and the third batch is in queue. Only a couple more batches to go...

Oh & why do I make so many sweet potato pies? Years ago, we liked them so very much & they have veggies, milk, butter & eggs; I decided that we could eat them for breakfast, lunch and dinner. It was better than a few other things I was feeding my then young son.
Now for some of the How To's:
Storing eggs with mineral oil: Eggs
Pressure Canning Butter: This is how I can butter.  Click into the album and then on each picture for details along the way.


Friday, November 22, 2013

If I was a fancy cook...

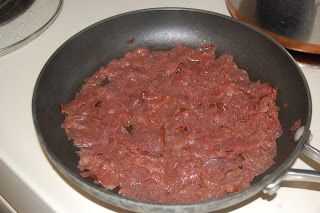
(Dehydrated chipped beef, canned milk, canned butter)

...I would call this Béchamel Bœuf.
I am sure that like me, you have seasonal foods. As the colder weather is arriving I find I turn to the same recipes often. Chicken & dumplings, chili, creamed tuna on toast (I know sounds terrible) and creamed chipped beef are on the top of our list. I really love that now I have stored all the items necessary to make these meals, I can easily prepare our favorites.
Last night was creamed chipped beef all from storage.
I have used white cream sauces for years for lot of recipes. Learned it has a fancy name “Béchamel sauce”. Fancy name for a not fancy cook. But, I don't use recipes. Here is an example recipe (for rough estimates).

Creamed Chipped Beef from storage items.
Dehydrated thinly sliced beef 
Flour (stored)
First a covered the dehydrated with hot water and cooked it on low, until the beef was rehydrated.

Drained remaining water and some butter. Added some flour to create the roux. (Equal parts of butter & flour). Then slowly added the ½ & ½ and cooked until it was thick. Add salt & pepper to taste.
The only thing I don't have stored was the English muffins. I now have a recipe to try. Toasted them and covered with the cream beef. Warm & filling.
Being a little lazy here & just posting the pictures in order. 


Monday, November 18, 2013

"Mining" for silver...

We are still converting the master bedroom closet into a controlled storage area.
This weekend we removed these two cabinets. I cleared everything out of them & will be selling them on a "re-use site" locally. 

This was a big task, considering that the item on the right was my mother-in-laws jewelry case. The older bother got his pick of jewelry when she passed away & some was given to the grandchildren & we got the left overs.
MIL spent a LOT of money on jewelry (clothing and shoes), but she had a preference for silver.
Anyway, this weekend-I went though and sorted all the remaining jewelry to see how much "silver" we had.
DH did some research and we decided to use a neodymium magnet to sort thought the jewelry.
Here is an article that will give you tips on how to test for silver.
3 Quick ways to tell if an item is made from silver
We also plan to get some bottled test kits to do a second verification. 


My guess was these were all silver & I was correct.
These are the two neodymium magnets, DH just happened to have on hand. It always amazes me what he has hanging around.
So, you hold the magnet close to the piece and if it is not silver, the magnet sticks to it. This earring isn't silver.
If the items is silver, the magnet will not stick. This necklace is silver.
You can also find "junk silver" in old coins. The value of the precious metals in the coins before these dates (below) is worth way more than the face value of the coins. 
Pennies minted in 1982 or earlier.
Nickels minted in 45 or earlier.
Dimes & quarters minted in 1964 or earlier.
Take the time to check your change. 
So, all of that to make more space in the closet to add another shelving unit. More on that later.

Saturday, November 16, 2013

Elderberry Syrup...

One of my goals for this coming year is to start learning and practicing more homemade homeopathic remedies. So, it was time to make some elderberry syrup.

I bought my dried elderberries from Amazon. I ordered and used both kinds. Here is the link:
Perky Prepping Gramma's Store I actually bought both kinds listed in the store.


I used the recipe that Heidi Gossman Burrows has used and shared. It was so very simple.
The recipe is from Learning Herbs
Ingredients:
1 cup fresh or 1/2 cup dried elderberries.
3 cups water
1 Cup honey (I now use a LOT less honey when making the recipe. Probably down to less than a 1/2 cup honey for one batch)
EDITED: (1/26/14) Now I add a couple of slices of dehydrated ginger to my recipe.

First, add 1 cup fresh or 1/2 dried elderberries to a pot and add 3 cups of water.
Bring to a boil & then reduce the heat and simmer for 1/2 hour.

 Smash the elderberries. I need to find my regular masher (and get 2 more)

Strain everything with a strainer. I also used cheesecloth to be able to squeeze as much as possible out. Actually the second batch I made I didn't used the cheesecloth, because my strainer was sufficient for the job. I did order more cheesecloth and more strainers.
CAUTION: Don't eat the seeds. There is some chance of toxicity. I just googled it & read about it. A couple won't hurt. just use caution.


Add 1 cup of honey. I may add less honey next time. Did you note I use local raw honey?
EDITED: I now will use a lot less honey. This was too sweet for my taste. On the second batch I only used 1/2 a cup of honey. I may use even less on my next batch.


Don't you just love this bottle? I got it at Ikea several months ago.
The syrup is so yummy. The hard part will be not to just drink it. 
Then I used a funnel and pour into a bottle of jar. You store the syrup in the fridge. It will last for several months.


So, yield about 3 cups of elderberries syrup & I vacuum sealed the rest of my dried elderberries. 

REMINDER: Don't use raw honey with young children

 you are able to use other sweeteners like raw sugar. 

Dosing: Straight from Learning Herbs:
"Elderberry syrup is one of the most popular herbal cold remedies in Europe. Elder has been used for centuries and is one of the most well documented herbal cold remedies. It’s also great for lots of other stuff, but we’ll keep it simple for now.

You can give the elderberry syrup by the teaspoon (kids love it) every 2-3 hours while sick, or even use it regularly in your food, such as on pancakes! Elder is VERY high in bioflavonoids and is a great antioxidant. 

For kids under 2, add the syrup to hot water to kill any microbes in the honey that might make them sick."

Monday, November 11, 2013

In the beginning (part 4)...

There were three things that really helped to establish how I approached my preparations. Budgeting, challenges and goal setting...
These things help me stay very focused on what I am doing. It allows me to be actually be doing stuff, working towards our goals every week. Not haphazardly, doing things here and there.
Very early on, I started working with a specific percentage of my income to be dedicated to my prep's.
My budgeting started out something like this, 10% for my tithe, then 10% for prepping & 10% for savings. The savings would be cash on hand for big purchases (i.e. Zaycon chicken or sales on canning jars, lids). Then I used the other 70% for everyday, monthly expenses. When that runs out, I am done. This extra 10% for saving quickly added up. We also have worked towards having a least two months cash on hand at all times in case there is some type of financial collapse (either the government, banks or loss of our jobs).
NOTE: If you have a belief system that doesn't believe in tithing, I still encourage you to develop the habit of giving to others. It is my opinion that whether it is tzedakah or mitzvah  (I hope I am getting the terms correct, if not please forgive me), or simply giving to charity; I think it changes your outlook in life.
Next, I like challenging myself (and others). I once took a challenge where I was only allowed to spend $250 for one month. It was a very eye opening experience. After pre-paying the monthly bills (which we were allowed to do),
What I learned from this challenge, was that there was a lot of extraneous spending in my life. For example, I ate out several times a week. Since then, I may still get take out or delivery, but it is only maybe once or twice a month max. What changed at that point, was I decided I could truly budget 20% of my income for prepping. I have learned something every time I take a challenge.
Next, I settled in on setting monthly goals.
I quickly decided to establish monthly goals. Each month there is a goal of “Meat (canning) & Something else”. Here are some examples from last year, when I was getting started.
November: “Meats & Thanksgiving items”, this would be all the items I use for our traditional Thanksgiving meal. Like right now, I am buying (and storing) various items like, pineapple, mandarin oranges, marshmallows, nuts, cranberry sauce, etc. Plus, this is my second year doing this, so I will be testing out what I stored last year.
December: “Meat & Christmas items”, this included our traditional Christmas Eve party of special foods. On Christmas Eve we each get to choose a couple items that we just don't get through out the year, either because they are generally too expensive or they don't fit into our lifestyle now.
January: “Meat & Water (storage containers & filtration)”
February: “Meat & canning butter”
March: “Meat (corned beef and cabbage, Zaycon chicken breasts) and waxing cheese”.
I plan based on seasonal sales & what I want to learn next (I have an ongoing list of things to learn).
It has been very helpful for me to post my goals at the beginning of the month & a review at the end of the month. Doing this keeps me accountable. I focus on posting the things that I am actually doing and don't post a lot cutesy stuff or re-posts of things I am not doing.
I think one of the biggest steps is actually deciding to make preparing a priority in your life and then doing something about it.
I am extremely dedicated to helping the newbie get started. Since we are on this journey together, I will throw this challenge out there: Are you ready to get dedicated to your preparations? How do you plan on doing that?

Here are links to the first three parts of how I got started:


Monday, November 4, 2013

So, you are ready to start preparing for the "Cyber Canning Event"?

Starting the the last thing first, since the rest has already been discussed.
Last but not least, you need to have at least 8 lbs. of meat to can. I am going to recommend that you buy boneless, skinless chicken breasts for you first canning project. It is just simpler and less work to prepare them for canning.

"Pressure canning is way easier than making an origami elephant" ~Perky~

Let's get our equipment purchased & prepared for the “Cyber Canning Event”.
First you need to purchase (or have on hand) the following items listed below. We want to go ahead and purchase these as soon as possible. That way if you order something online it will arrive in time for the event; or if you have trouble finding something like the canning jars, you have time to search. There are links through out this article of where to purchase.
1. Pressure CANNER <<< (link to buy a pressure canner. Not a pressure cooker or water bath canner) This is currently the best buy, IF it will fit on your stove.
IMPORTANT TIP: When you are getting ready to purchase your canner, measure your stove CAREFULLY. You want to insure that the entire canner will fit on your stove & not hit any appliance that may be OVER the top of your stove. I would purchase the largest size, that will fit on your stove.
If you need a smaller (16 qrt. canner), you'd honestly get a better price at Walmart.
2. Canning tools <<< (link)
3. A least one case of canning jars. I recommend that you purchase wide mouth, pints sized canning jars.
I recommend that you first try to find the canning jars at a local grocery store. You can also order online and pick up from your local Ace hardware. Then last, but not, least you can order them from Amazon
This link is for regular mouth jars.
4. You will also need to have various items like dish towels, paper towels, vinegar, a timer (one on the stove or microwave will do).

Disclaimer: The links to Amazon, are to my personal Amazon Store. I do receive a small commission, if you purchase through my store. BUT there is no additional cost to you. I only recommend items that I use, have purchased & usually include free shipping (for the standard purchase). I do not receive any commission from other stores. 
Perky Prepping Gramma's Store


Here are some additional articles to read over for preparation for the event.
Attitude, altitude, aptitude... (this links to another person blog)


Saturday, November 2, 2013

Attitude, altitude, aptitude...

Attitude of safety.
Yesterday I was canning a little left over chicken broth and my DH was in the kitchen. He looked at me funny when I picked up the lid for my canner, held it up to the light and said “check the vent hole”. I explained to him that there are important steps that you need to do every time when canning. And yes, I do them every time.

While I may be a bit of a renegade canner, I ALWAYS follow the safety steps & I am a stickler about sanitation.
Shanon shared what her grams taught her “she said even the best will have a mishap every now and then that's why you need to always practice safety remember it can't speak to you and say shanny you forgot a step.”
These links are to various photo albums on my facebook page and a blog post to help you get started.

Also, if your scroll back through the facebook page, there are other general canning posts that I have posted last week.

Altitude and canning.
It may be a little known fact, especially for newbies, that the elevation of where you live impacts what pressure (pounds of pressure) you need to attain for canning. Most recipes list instructions for elevations of 1,000 feet or less.
If you live above 1,000 feet above sea level, the atmospheric pressure changes. This impacts how your pressure canner cooks.
Here is a great article from Simply Canning that explains it in simply detail. Attitude Adjustments. This includes charts.

The great thing is once you figure out the altitude of where you live, you have the information you need to can properly.

Aptitude: The natural ability to learn something. You don't have to have a natural ability to can.
You can learn how to to it and through experience you will become more comfortable over time.
One year ago, I did my first pressure canning session. I made my experienced friend teach me. I was listening, taking instruction, a little nervous at each step. A year later, we were canning again (this past weekend). I realized just how much I have learned over the last year.
I was the one giving directions, reassuring her when issues came up.
The difference: she shared that she has only pressure canned proteins when I came out and made her. LOL. I have been pressure canning proteins every single month, sometimes several times a month.
Experience trumps aptitude and the can do attitude makes it happen!