Thursday, July 31, 2014

Each Sunday I say the same thing...

"It's Sunday! My favorite day of the week!"
Talking about God today.
I suppose you are able to figure out I am a follower of Christ. If not, surprise!
Sure I enjoy Sundays, they are peaceful & restful. I love the community I worship with, they are really awesome. Plus, I have the added bonus of usually being able see some of my grandchildren each Sunday morning. Which of course makes this gramma happy!
But, that isn't why Sunday is my favorite day of the week.
Each day of the week I strive to spend time with G-d. But sadly, I fall short.
Sunday I am able to go to a place and worship Him. My complete focus is on Him. He is amazing and I can't begin to explain how thankful I am for having Him in my life. I love having that opportunity. I am grateful for the freedom of my beliefs and for the comfort of a facility (we are mobile & meet in a school) with walls, a roof, air conditioning...
But honestly, sometimes I just want to smack people.
I find in our society, we complain about so many things or lack of things. I was reminded yet again of this fact this week.
One of my BFF's just came back from Africa. She was working with an orphanage where 90% of the children there are HIV positive and/or are have disabilities.

Watching her videos and seeing her pictures was a reminder of all that I have.


We should really be grateful for all that we have & how little we truly need. 

It's Sunday! My favorite day of the week! And I am truly grateful. How about you?

A Real Life Cautionary Tale...

The world is changing. We need to be more aware each day. This is from a person you know in our community. I am proud this person is willing to share their story, so we all are able to learn a valuable lesson. I am sharing this tale in it's entirety, because this is their story to tell. Please listen. ~Perky~


Good morning. I just wanted to talk a minute. Monday evening my husband and kids came to pick me up from work. When we got home our door was open. Now I've lived in this small town all my life.
We live on the back of 5 acres in a forest. You cannot see the house. We lock our door occasionally. So we found our safe open and all the belonging
s on the floor and our money was gone along with a gun and some small items. They had moved over our window unit to throw out the goods.
We called the police. I had to go to the end of the driveway to flag them down as they didn't even know there was a house back there. They took pictures and dusted for fingerprints. They found no prints. I find that odd because they should have found my husbands at least. The police did not even do a perimeter check. Around 1am that night, since I could not sleep, I woke up my husband and told him that I think they dropped our stuff in the pasture and will return later to get it and we should go look.
Sure enough! They dropped the belongings by the gate. They took the money, coins and a nice antique pocket watch though. I was so mad that the police did not find this when they were out initially. This stuff was only 20 feet from our window!!!
Since then my husband has been so mad at himself. He got complacent and did not lock the safe nor the house door. I explained to him if it had been locked they would have destroyed the door to get in and took more belongings than what they had gotten out if the safe. You can replace money but not sentimental guns, jewelry
etc.
Yesterday he installed a couple cameras in the house, new dead bolts and now the safe is locked. I don't like putting my money in the banks for fear of bank holidays etc. So I think we will be hiding stuff all over the house in weird places. We will have a code as to were it is so we don't forget.
There is a message here that God was telling us. I'm thinking He was telling us to depend on Him more than our money. I did not realize the comfort I felt knowing we had some cash to depend on when times got tough when all along I should have had comfort in Him knowing he is always there in tough times and good times.
Now we are lost. We have to adjust to REALLY depending in Him. We should have been focusing on God the whole time. We did not even realize how we had gotten far from Him. We are active in our church and do our home bible studies etc. We love our church family.
Our money security blanket is gone and we HAVE to depend on Him. Funny how He makes us listen. I'm not mad at Him. I'm grateful. He has opened our eyes in a creative way. I love Him so much. I'm thankful that our family was not home and could have gotten hurt. It will take about a year to save up what we lost in money but our focus is different now.
I encourage your followers to not trust anyone. Use your locks, lock your safes, purchase a security camera.

They are out there and will steal from you.
Our pastor came out that evening for support and said a prayer. It was pretty powerful. All I can say is I'm glad I was not the thief who stole from us. Gods wrath will get them. It's not up to me it's up to Him Please, in your new home don't get complacent. Get a camera and lock your doors. Just because you are in the country doesn't mean those thieves will not find you.”

Wednesday, July 30, 2014

Starbucks evangelism...


Why I do what I do… I have worked at Starbucks for nine and a half years now. Now I am taking this month off and one of things I will be doing is deciding if I will try to find another position as a barista in a town close by to where we are now living. 
Believe it or not, I feel that God called me to this job. I love working with my partners, I love most of my customers. Just don’t ask me about “grande, 2 raw sugars cappuccino”. Ugh! 
I have found that I have had far more conversations about faith (God, JC the whole thing and everything else in between) than I have ever had anywhere else. Including church. I love talking about peoples faith journeys. People are so hungry for spiritual discussions. As long as they are not feeling judged. I am just really curious and sincerely want to know why people are where they are in life. 
Let’s see there is "venti, 7 pump melon, passion tea lemonade": who grew up unchurched and is really trying to find what is real and not real. 
And what about "venti coffee with hazelnut syrup": grew up Catholic but is feeling very far away from all things God. Drinking, drugging, lots of meaningless sex. 
Then there is "double tall vanilla latte": grew up without any faith journey at home at all. She has been investigating pagan (ism?). 
Oh and "triple grande breve latte": married, lapsed Lutheran, who needs to talk about having an affair with her co-worker. 
Well then, I also have to mention "doppio espresso": who states proudly that she doesn’t believe in God, but in pirates. Seriously. 
The funny thing is I am a "fluffy, perky gramma" (I started using the "perky" term 10 years ago) and anyone that knows me, knows that I am totally in love with God. I realized some time ago that God calls me to be in relationship with his children that are tattooed pierced and disenfranchised. It started out as unintentional for me (not Him).
The stories go on and on… It’s not my place to judge anyone where they are on their journey, but to just honestly love people where they are at. And that is why I do what I do. 
I live my life by my vision statement of "Love God, love others, it's simple" and my life's mission statement is "entice the skeptic, challenge the lukewarm & ignite passion in the believer".  This applies across the board from work to what I do here as a prepper. 
This month of decision making is going to be interesting to say the least. I guess some of it will depend on if the new Starbucks location will accept my strange restrictions on when I will work. I have a funny feeling that I feel that I may wind up back at Starbucks, we will see. We will see if God is still calling me to this job.


While this is being written in late July 2015, I am post dating the blog post.

Monday, July 28, 2014

Do YOU Want to Save/Earn Money with Zaycon?

What is Zaycon? 
Today is Zaycon Chicken Event Day in my life. I just recently ordered my 40 lbs. of boneless, skinless chicken breast. 
When I first heard about Zaycon foods, I went to their site and read everything about them. Then I registered. I understand that forty pounds is a lot of meat and even with a decent per pound price, it is still a big chunk of money to lay out. Thankfully, I started saving up money each month & was able make the purchase from my saved money. 


Then initially they didn't offer any “events” remotely close to my area. But, I registered anyway & I have encouraged others to do the same. I learned that from Zaycon that the more people that register and share, the better chances of creating a new event location. It really did work. Now if you really live in the boonies, you may have to travel more. As LeAnn knows they don't ship to Alaska yet.

After you register, you then look for events that are close to you. I was willing to drive about an hour to be able to pick up my chicken. It is worth the drive for me, especially for the quality and cost of the chicken.

Honestly it took me awhile to decide that I was going to purchase from them. But I finally decided I was going to order. I talked to a friend and the first time we split a case of chicken (20 lbs. each) and we pressure canned the chicken breasts together.
There are Zaycon support Facebook sites in some areas. Mine is Zaycon Fresh of Virginia. These sites, if available allow you to find other people what are will to share an order with you. 


Just look at the size of this chicken breast. These are really cage free chickens, the super size comes from what Zaycon specifically orders from the farmers.
Most retailers & restaurants order smaller sizes. I called to ask them.

So, how do you save on your purchase? 
The power comes from sharing with your friends. 
  1. Now please allow me the honor of being the person that introduces you to Zaycon. click this link & Register. This is my unique link: https://www.zayconfoods.com/refer/zf144734
  2. After you register you will receive your unique referral link & SHARE YOUR REFERRAL LINK with your friends. This is a really important step. When people you know register and purchase, you will receive $1 credit each time that person purchases - to apply to your purchases.
  3. Then subscribe to an area (or two, depending how far you will travel) under the location tab.
  4. Order your chicken or other product.
  5. Then the day of your local event, you drive up, hand them your confirmation, they load it in your car. 
Back to my friend, as I mentioned we split our first case. We were so impressed with the quality of the chicken, she registered and the next time we bought 3 cases (60 lbs each). I got a credit of $1 for her purchase.


40 lbs. of chicken ya'll

Even if I didn't get referral $1's, I still wholehearted believe that this is an excellent deal. The quality alone is worth everything.
I know several of you already do Zaycon, please feel free to share your thoughts.

Tasty bacon from Zaycon: baking
for Pasta Carbonara from 100% from storage

Zaycon really does offer a great deal on fantastic products. The food is superior and I have been so very happy. Why not hop on the Zaycon band wagon today?
Glad you visited today & would love it if your joining our community in Facebook at Perky Prepping Gramma.
P.S. I almost missed the fact that we will be living in our new house, 90 miles away from our current location. Glad I caught that before I ordered. 

Sunday, July 27, 2014

SEX in the garden...

Well now, did that get your attention?
I like to say “there are questions a newbie doesn't even know to ask”. That is certainly true about gardening.
It's my second year gardening. As with most of the new things that I am learning & asking questions about, I just start researching.
I actually found this a little humorous, so gentle readers I hope you are not offended. Life on the farm is about sex. Life in the garden is about sex.
Mother nature has a sense of humor when it comes to sex in the garden. Take the yellow crook neck squash.
There are male flowers and female flowers both on the same plant. Sort of like Romeo & Juliet, they are so close, yet so far away.
How do you “sex” a flower? It is really easier than you think.
There are two ways to determine which is which. First we will start with the stem.
Boy stems are straight. Girl stems have a little bulge.


Gently pull the petals back and inside what do you see.

Well, check the inside if the inside matches you ah, down below...then that flower is the same sex as you are. A little boy flower looks like a male. The little girl flower looks more like a female.


Now, if you remember the birds and the bees talk from when you were younger, the boys have to pollinate the girls for there to be babies; I mean fruit.
There are more boy flowers than girls flowers. If you are having issues with squashes developing on your plant, you may need to assist mother nature.
You take just the inside of a boy flower and sort of jiggle it around inside the girl flower. That allows the pollen to drop inside and fertilize the female flower.

Well evidently my boys and girls have been playing well together, since I have been getting a lot of squash.
But, I certainly learned a valuable lesson today that will help me in my future gardening endeavors. Skills I didn't know I would need for gardening.


What I do here is simply share our preparedness journey. If you liked this post we would love it if you joined our Perky Prepping Gramma community on Facebook, comment or share. Plus it would just make my day.
Items I have used this week:

   
Your order is so very appreciated, because anything ordered through my Amazon Associate links helps me to be able to stay home and write for you. Perky Prepping Gramma is a participant in the Amazon Services LLC Associates Program, an affiliate advertising program designed to provide a means for sites to earn advertising fees by advertising and linking to Amazon.com.


Some spiffy storage ideas...

Where to store your preps is on ongoing problem for most of us.
With our impending move, my focus for everything is in revamp mode. Particularly when it comes to storage.
Currently we have converted our walk in closet in the master bedroom into a storage room. 

The new place has three bedrooms and believe it or not, I am seriously thinking about making one of the smaller bedrooms into our bedroom & making the largest room a storage room. When I look seriously at it, the room I sleep in is just that...the room I sleep in. Therefore I don't have that much need for a lot a room.
In the beginning I utilized banana boxes to store my canned foods from the store & repacked my canning jars back into their original boxes. Since I have store bought canned goods in the boxes, they are able to be stacked up several boxes high. 

Along those lines, I've been looking at a newer way to store my preps that minimize the floor footprint and maximizes that vertical storage. A few months ago, I realized that there was a lot of extra space on my storage shelves.
To add more storage space in a smaller amount of room, we purchased two shelving units-to build into one unit. Basically added double the amount of shelves into one unit, spacing the shelves based on the size of the canning jars being stored. This is always a work in progress. Hopefully I will have a better system when I move in. Note the water on the bottom left, we raised the lowest shelf of the unit, so the 1 gallons would fit underneath.


NOTE: I like and recommend the Seville storage units, which are available from several sources. I specifically look at the weight capacity for each shelf.


Since we have to move everything anyway, I am looking at implementing several ideas from this lady at Jonesing2Create.com. She mostly shares crafting ideas, but happens to be LDS and shared this method she developed for her 3 month food supply. 


While I am at it, don't forget utilizing those 5 gallons storage pails with gamma lids. While I haven't had luck (time) finding pails for free, i know lots of people have. Actually lets share ideas on where you get your five gallons buckets for free.


This is a nifty idea that I tried from Katzcrdul. I feel the concept works well, but it didn't really work for me since I don't drink that much soda. But, maybe it will work for your storage.


Then there is the standard under the bed storage. "They" say you are able to store a years worth of food storage under a bed. Personally, I store my meats there.
Currently the whole space is filled with pressure canned chicken breasts. Chicken is my favorite meat. I have bacon, chicken, corned beef, ham, hamburger & hamburgers, sausage, steak, and a couple types of Italian sausages. 


Surely you have seen my sweet & treat storage. This is an old kitchen cabinet we use in the living room. Note: Lots of chocolate!


Storing water: This can get difficult, The best idea I have come up with so far for in house water storage is I turned the Augason Farms 55 gallon water barrels into the t.v. stand.
You may get your barrels from Walmart, or Amazon (link below) . Same price, same equipment. Amazon is fastest for delivery. 

This obviously isn't an exhaustive list for storage ideas. It's not even everything I utilize. What is your favorite tip for storage? Please feel free to share a picture. Hopefully this sparks some new ideas for your storage.
Thanks for joining me today, if you want more original content faster, instead of getting it second hand- I would love it if you liked me on facebook. 


Affiliate Links and Ads: My site contains affiliate links and ads. I generally only list what I use personally & recommend. Example: Note in this article I recommend that you get your water storage barrels at Walmart. They are way more cost effective from Walmart. I really do a lot of my own shopping online. Have I mention I don't like to shop? LOL.

Friday, July 25, 2014

What do I do on payday towards prepping?

It's Friday! I'm off & it is payday...
What do I do on payday towards prepping?
I mostly deal with a cash envelope system in my life.
On payday, first I check my account (direct deposit) and see how much I received in my paycheck. I am am hourly employee, so this changes. I jot down the amounts.

SHOPPING CARTS: Between paydays, I add items to my Amazon & Walmart shopping carts. On payday I just review my carts & then purchase. I will add things I need or that are next on my list of items to purchase for preparing.


(Photo credit gojiggy)

USE ONE, BUY TWO: When I use up a regular item & pull one from my stock, I add two to my shopping cart(s). For example today my shopping cart has 2 of each of the following: deodorant, toilet paper, chili powder, toothpaste & cotton swabs. Honestly by now, I barely even think of this back stocking. It is just a habit, I really don't consider this part of my prepping $$.

After I make my online purchases, I recheck my balances, take my shower, I hop in the car and head out to the bank. I withdraw most of my money out of my account (restricted by their cash limits), to take home and divide up among my envelopes. If I happen to need to go to the grocery store, I will do that and get an additional $100 of cash. My goal is to get as much cash out of my account s possible.

WAYS I SAVE:
For Walmart I actually go through a service called shopathome.com. I can get 3-5% back on purchases. This takes awhile to accumulate. But for me, every little bit helps. About having my information out there; unfortunately that boat sailed a long time ago. I will be reevaluating this after I move.

For Amazon I save in a couple ways.
I actually have an Amazon credit card (the only card I own). You also get cash back from that. As soon as I purchase something, I immediately go to my banking account and pay that amount off. I never have a balance on the card.
I also save by having Amazon Prime. Honestly the only thing I care about is the free two day shipping. It has come in really handy when I needed items really quickly (like, oops :D a birthday party)
They have two free trails running all the time. One for students (½ price) and one regular.

Also I have an associates account with Amazon. I receive a small commission when people purchase items that I recommend. I only post things I am confident in and actually remove items if I don't like them. Since I don't receive the commission on my own purchases, I actually gift them to another blogger.


Then I start the rest of my weekend list of things to do. Sunday I will be sharing another older post with more details on how I manage the cash system, taking challenges and goal setting.

As always, if you found your way here from another location, please feel free to like Perky Prepping Gramma on facebook. Thanks, ~Perky~


Saturday, July 19, 2014

How To Dry Can Hamburger

Since it was our first time getting hamburger in our area & I had heard such great things, when DH got home we left one (10lb.) chub out and froze the other three.
We had delicious hamburgers for dinner that evening. I think this will be a tradition now.

On to canning...
I got everything sterilized and ready to go. 
Ground meats need to be pre-cooked. Too many surfaces, nooks and crannies. 

EDIT: Ground meats are a little different. Because of the texture the NCHFP states it needs to be pre-cooked. There are just too many nooks and crevices in ground meat, that COULD harbor harmful bacteria. It doesn't have to be completely cooked. On a more practical note, the other reasons are you want to eliminate as much fat as possible. Pressure cooking with all that fat, creates a very mealy texture in the end product. And lastly, you will be able to add more meat to your jars when it is cooked down some. Hopefully that helps.

So, I took the Zaycon 93/7 hamburger and cooked it up to about medium, since it will cook more in the processing.


There was very little fat, so using the canning funnel I just starting putting the hamburger into the jars. EDIT: Make sure you drain all the fat off that you are able to before you pack. Next time I will be using paper towels to drain off more fat. Lightly packed it in and left about 1” of head-space. Salt is optional.


Then I cleaned the rims with vinegar on a paper towel to get rid of any random fat that may be there.


Added the new cleaned lids and rings and put them in the pressure canner.


Canned them at 10# pressure for 60 minutes (for pints).
After the pressure had dropped I took the lid off.
TIP: I use a dishtowel to help prevent the steam from from getting on me as I open the lid, tilting it away from my body.


Man, they look good. I am going to have tacos later this week and I will let you know what I think of the taste.


If you are a newbie (or not), please feel fee to ask any question on facebook. Or maybe this post will help you out. Calling All Newbie Canners & Ye Who Haven't Canned Yet. There is multiply posts here on canning in general. Just start reading, I promise it is easier than you think. Then share a picture with us on facebook. Happy Canning!

Did you know you could easily can hamburger patties? 
Cool side note: When I checked my Zaycon account today, I found they had credited me a small amount of money. Evidently when your order isn't 40 lbs., they credit your account. Pretty cool customer service in my opinion!


Saturday, July 12, 2014

Calling all newbie canners & ye who haven't canned yet...

When I first started canning, I would get so confused. There were terms I had no clue as to what they meant. Finger tight, head-space, “jiggle”
You would think that the word “jiggle” would be self explanatory. Nope, not so much. Keep reading...
This last weekend I pressure canned some green beans and squash & thought I'd share some general canning information as I went along.
*Disclaimer: Recommendations for canning summer squashes, including zucchini, that appeared in former editions of So Easy to Preserve or USDA bulletins have been withdrawn due to uncertainty about the determination of processing times. Squashes are low-acid vegetables and require pressure canning for a known period of time that will destroy the bacteria that cause botulism. Documentation for the previous processing times cannot be found, and reports that are available do not support the old process. Slices or cubes of cooked summer squash will get quite soft and pack tightly into the jars. The amount of squash filled into a jar will affect the heating pattern in that jar.
Note: This wasn't based on outbreaks of botulism cases, but that they couldn't find the documentation of processing times.

Important lesson here: these are “low acid foods” Low acid food needs to be pressure canned. Let me repeat that...low acid food needs to be pressure canned. 
First, read your book that came with your pressure canner. It has exact directions for canning, especially since various canners have different equipment on them to determine pressure etc.
I am cautious to sterilize everything along the way and aware of allowing enough head-space to keep the contents from creeping up the jars and disturbing the sealing process.
I am not going into every detail of canning since you are going to be reading your book; I am giving general instructions and I want to define some terminology that I didn't understand when I began to can.
First get all of your canning equipment, jars & lids clean, sterilized together and ready to use. I also thoroughly clean and sanitize my counter top and sink. I normally keep all my canning equipment together in a bag and inside of my canner when not in use.

(there is a link at the end of a handy glossary)

That way I don't have to go looking for everything when I start canning. I also have an “s” hook, that I hang the bag from off of a shelving unit close to where I am working. I actually keep two sets of equipment in the bag, in case I happen to drop a utensil, I will have the back up already sterilized and available. Link to see how I do this: Getting Started and Organized.
EDITED (083014) From the Ball fb page: "After extensive testing by our Quality Assurance Team we have determined that it is no longer necessary to to pre-warm lids before use. If you desire, it is still safe to “simmer” your lids before use however, you should never boil them. To prep lids we recommend simply hand washing them in hot soapy water. "
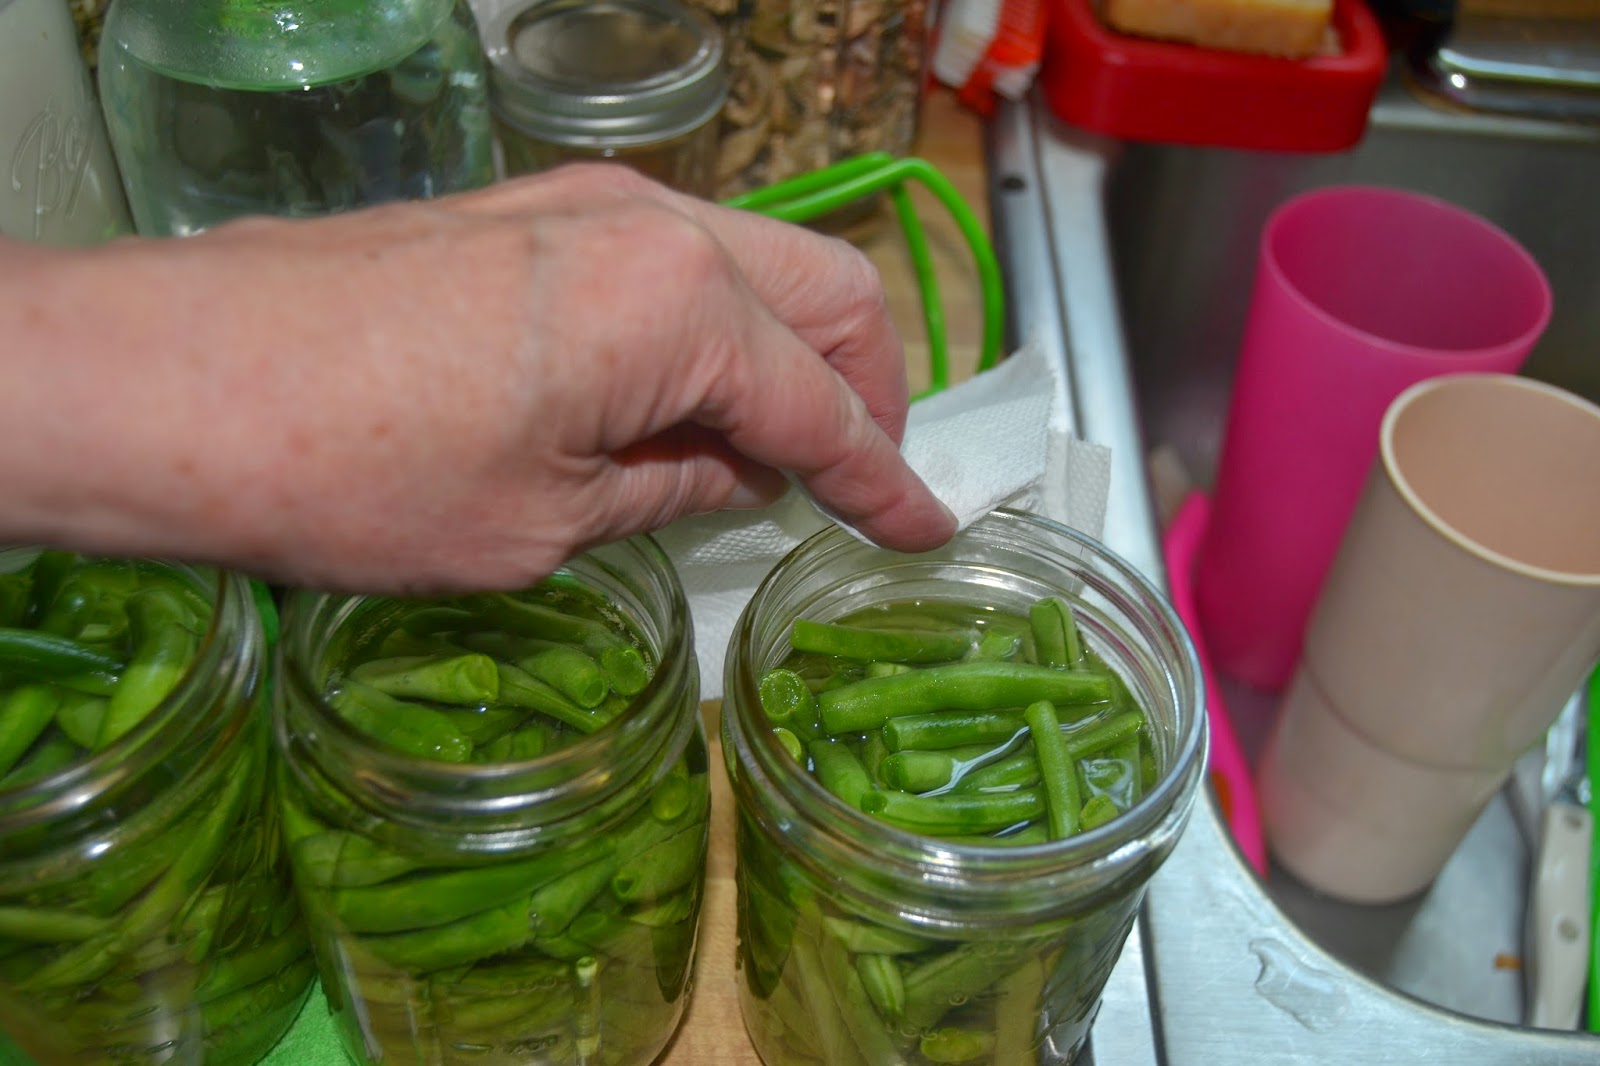

While this is going on I clean my vegetables and prepared them for putting in the jar. This time I used the cold-pack method. Put the veggies in, with the recommended head-space.
This diagram from Presto shows what various head-space amounts look like.


Then clean the tops of the canning jars with a paper towel (or a clean cloth) and vinegar.
Add water, use the bubble popper to release any air bubbles trapped in the jar, and add more water if needed.


Clean the rims of the jars with a towel & vinegar.


Add a lid and ring to each jar from your hot water.


Tighten the ring on the jar to “finger tight”. Now what does “finger tight” mean exactly? From Clemson.edu “A practical way to determine if the lid is fingertip tight is to place the band on the jar, turn it just until you feel resistance, then turn the band one-quarter turn more. For beginning canners, it may help to mark the band and lid with a marker at the point of first resistance and at the point that represents an additional quarter turn and to then turn the band to that point.”

Place your jars into your pressure canner and add the appropriate amount of water, based on your canner. On my Presto there is a line inside the canner.


Check your lid to see if you are able to see air through the vent hole, and then place your lid on your canner and secure. Set heat to high and continue heating until a steady flow of steam comes out of the vent.

Set timer for 10 minutes, let the steam continue to vent for 10 minutes.
After the timer goes off, add appropriate weight. Check your canning book for your weight pressure based on the altitude of here you live. Here is a link to an altitude chart.
FOR WEIGHT ONLY CANNERS: After adding the weight, keep temperature up until your weight “jiggles”. A jiggle is when the weight on top spits, sputters or wiggles a little. After the weight starts to jiggle, reduce your heat until the weight is only jiggling 3-5 times a minute. This takes a little practice.
Keep an eye on your pressure gauge and/or weight during the process. You are able to reduce the heat, as long as you are maintaining the proper pressure. With my stove, I am able to reduce the temp. to low during this time.
It all depends upon your stove.
FOR GAUGES: after adding the weight and gauge, bring the pressure up to the appropriate pressure (again check your book)
Then reset your timer for the proper time for what you are canning. It will vary depending on what size jar you are using and what you are cooking (again check your book).
For my altitude it is 10# of pressure, cooked for 25 minutes.
When the timer goes off: turn off the heat and gently move the canner from the heat.
DO NOT REMOVE WEIGHT, GAUGE OR LID.
Let rest until the pressure gauge drops down to zero or when the little button drops down.
Remove the lid carefully, turning it away from you when removing the lid.
Smile when you start to hear the pings!
Gently remove the jars from the canner and set on a clean, dry dish towel.


Let them set for awhile. If a jar does not seal (ping), say in an hour (?) put that in the fridge and use it.
Let rest away from drafts. While not completely necessary, I cover my jars with a towel to help protect them from drafts. Just so you know, these may be a little mushy in consistency after pressure canning.


You put a lot of work, time and money into pressure canning food. When you are done canning, you just put the jars on the shelf, right? WRONG! I often say "there are questions that newbies don't even know to ask". I don't believe I have seen a list of the simple, yet very important steps to take after you finish a batch to optimize and protect your hard work. Check this link for important steps often missed.
Testing 1, 2, 3...
Check the lids periodically over the next few days, weeks to insure the lids remain sealed.
There you have it. I have used just a few of the terms we use in the canning process. For a more complete list check out the Canning Glossary from the BallCanning website. I read through the entire list, once I found it. Fun to learn things like the name of the “bubble popper”.

If you liked this article, please feel free to like me (Perky Prepping Gramma) on facebook & keep up to date on things I post. Thank you.
_________________________________________________________________________


Disclaimer: The following link is to my personal Amazon Store. I have listed many categories of items used here in this post and for other storage preparations. I do receive a small commission, if you purchase items through my store. BUT there is no additional cost to you. I only recommend items that I use, have purchased & usually include free shipping (for the standard purchase). I do not receive any commission from other stores. Perky Prepping Gramma's Store Thank you for considering shopping with me. ~Perky~