Saturday, March 7, 2015

Stylin' Perky Gramma turns 58 today...

My newest addition to my farm clothing. First, I am very fair skinned and I burn very easily, even when using sun screen. I once burned UNDER my clothes when I was in Jamaica while covered up head to toe. I was working outside building homes for unwed mothers who lived on the street in inner city Kingston.
Anyway, I have been thinking a lot about protective farm wear and decided that a prairie bonnet really would be the best option for my gardening and outdoor work. The best hat to protect me from the sun, the aprons that are practical and have pockets for gathering eggs. I got this lovely bonnet from Katie's Mercantile online store for $15. (633)
The material is lightweight, the brim is wide and the best thing is the ruffle in back which will cover my neck. If you check Katie's Mercantile on FaceBook, they currently have some sale "bundles".

I can hear my mother now "Just another phase for Dorothy". I have always viewed clothing as sort of a costume. Hip huggers and a suede floppy hat in the 70's, Army combat rifle team, designer suits for office work, the Story Teller, human trafficking t-shirt. 


At the end of this year I will be trading in my Starbucks uniform for farm appropriate clothing. While I have and always will be a jeans & t-shirt kid of gal,  like I said lately I have really been thinking about comfortable clothing.   
So with that in mind, I also got a jumper, shirt slip and several apron style jumpers. They are simply lovely, but I need to have all of them altered. Which is fine, since they are very cost effective to start with in my opinion. I now know what adjustments I need to make next time I place an 
order.  

Saturday, February 28, 2015

March Goals

Meat: Corned Beef & Ham Other: Moving
Back to my monthly goal setting. Usually I set my prep goals to pressure canning meat & something else.
1) With St. Patrick's Day in March I will be at least purchasing some corned beef briskets for canning which will be on sale. The hams will also be on sale towards the end of the month, so I will also be buying some hams.
2) Get all of our storage moved over to the new house. Well, along with moving everything else.3) Continue to establish a logical storage system in our new location. Previously we had several fairly large spaces dedicated to storage. I am going to have to be more creative with my storage, since we are losing about 700 square feet.4) Hopefully, I will be able to start canning meat again by the end of the month.

Do you have anything planned for March?

Friday, February 27, 2015

DIY Cute Little Chicken Coops or "Canning Chicken"

This is "Spirit" & she is a "Hennie"
"Hennies are sweet chickens with gentle dispositions, fresh from the brooder, and eagerly awaiting you to adopt" & they were hatched (created) by a wonderfully creative mom from Born Imaginative. She hand makes these cuties and sells them on etsy. I've been watching and thinking about these little peeps.
One of my biggest dreams is to have my grandbabies become excited about farm life with us. Passing on skills for their future; having them revel in the good life. 
So, I hatched this little gift idea to present to them on Easter. 


I got three little hennies, which come with "origami nesting box (from paper bags), wool hay and a wooden egg. They also come with a birth certificate detailing their date of birth, their breed and the unique and special details specific to their breed. " from Jackie's Esty site.
I picked up some edible grass & jelly bellies from Target. 


I made a little nest from the edible grass, tucked in some jelly beans, the wooden egg & their birth certificates into a canning jar. Then I nested each little hennie inside and added a lid and ring to finish off their new coop.
On Easter each child will receive their hennie & coop, plus the original origami nesting box and an additional certificate that will entitled them to each name one of the chickens on gramma's farm!
I did have to adjust the peeps to face the other way. Here are "Spunk & Cheer".


Very Important Tip: Make sure you don't put the lids on too tightly, because the hennies need to be able to breathe. (1127)


What in the world does this dress have to do with preparing?

First the question is: Is this dress white & gold or blue & black? I see a gold & white dress. Some will agree, others will swear it's black & blue. 


Credit: Courtesy of Caitlin

It's all about perception. I think we in the preparedness community often get caught up in various polarizing camps. When in reality we need to try to remind ourselves that simply being prepared is the higher goal.
None of us really know for certain if a catastrophic event occurs, what that event will be. But if we unify on being prepared to the best of our abilities, then we all win to a degree.
Now, don't get me wrong. There are sites I will not follow (support). Sites that are click-through (cannibalizing others work only to generate advertising profit for themselves), or fear mongering sites and hatred based sites (either way). For me, I do tend to listen to people who are actually doing the work & share their results. That tends to lead to more credible information. But, I still use my own brain and research to determine if it is correct for my family.
We can disagree about certain things, yet still work together for the greater good. 
I'll go back to my original premise, none of us have cornered the market on what actually will happen in the future. But, we will all gain if we work together more for the common goal of being a community of people what work towards being better prepared.
Join us as we work together. 

P.S. One interesting note, while this post on my facebook page garnered WAY more notice than the previous post an hour before of storage solutions; more people focused on the part about the dress, than the observation on being prepared. What are we doing to ourselves? 

The Science of Why No One Agrees on the Color of this Dress (wired.com)
I would love it if you joined our community on Facebook. Perky Prepping Gramma   BTW, the dress is really blue & black.

Thursday, February 26, 2015

How to Create Storage Solutions (part 1)

These storage solutions are ideas that we are actually implementing, which I am hoping to share with you as we go. Thankfully we have the advantage of taking our time in moving to our new home, since we don't have two mortgages. In this process we are slowly building in storage solutions that specifically work in our space. Hopefully they will give you ideas that you are able to use in your home.

First we took picture of every available space we could think of to add storage. I am sort of using these photos as a draft blueprint when planning the storage solutions.

Example 1: Closet(s)
This is a photo of one of the closets, then we measured the usable space.


Based on those measurements, we started out purchasing two of these Seville shelving units that would fit the space (associates link).


The disadvantage I first discovered with commercial shelving units were that there was too much unused space for our intended purpose; because most units only have 3 or 4 shelves or you wind up stacking things haphazardly in the attempt to use the space up. We found that is was less expensive to use two shelving units to create “one unit” for our space than purchasing and adding additional individual shelves.
This unit was built specifically to store quart jars on the shelves. Mr. Perky actually used a jar to adjust the height of each shelf. Then added additional shelves as needed. 

(half way built)

The only disadvantage is we now have extra poles; but I am sure we will eventually find a way to use the left over poles for another purpose.
These Seville Shelving units have proved to be really easy to put together, hold a lot of storage weight (read in the product description) and extremely sturdy. We have been using them for several years now and I highly recommend them.
As we get further along in the process I will update you on the progress.

Now that we have the first shelf in place, we will be moving jars into this shelf and pulling the three shelves we already have built in our current home (below) to start filling in the space. We will be readjusting the height of the incoming shelves based on what we are storing.


TIPS: 
1) See the left shelf: If you are storing bottles of water, I adjusted the bottom shelf to allow space for the bottles. It allowed me to have less weight on the shelves. This shelving unit was created to store 1/2 gallon vacuum sealed products. 
2) We filled in the corners with boxes from what I consider to be one of the best kept secrets in food storage, the lds.store.
3) The unit on the right was also built with two Seville shelving units to fit pint jars.

4)Mr. Perky got ahead of me on this project and went ahead and built the shelves right side up. The next unit will be built with the shelves “upside down” so that an edge will be created on each shelf to better help keep the jars more firmly in place.

Example 2: Kitchen
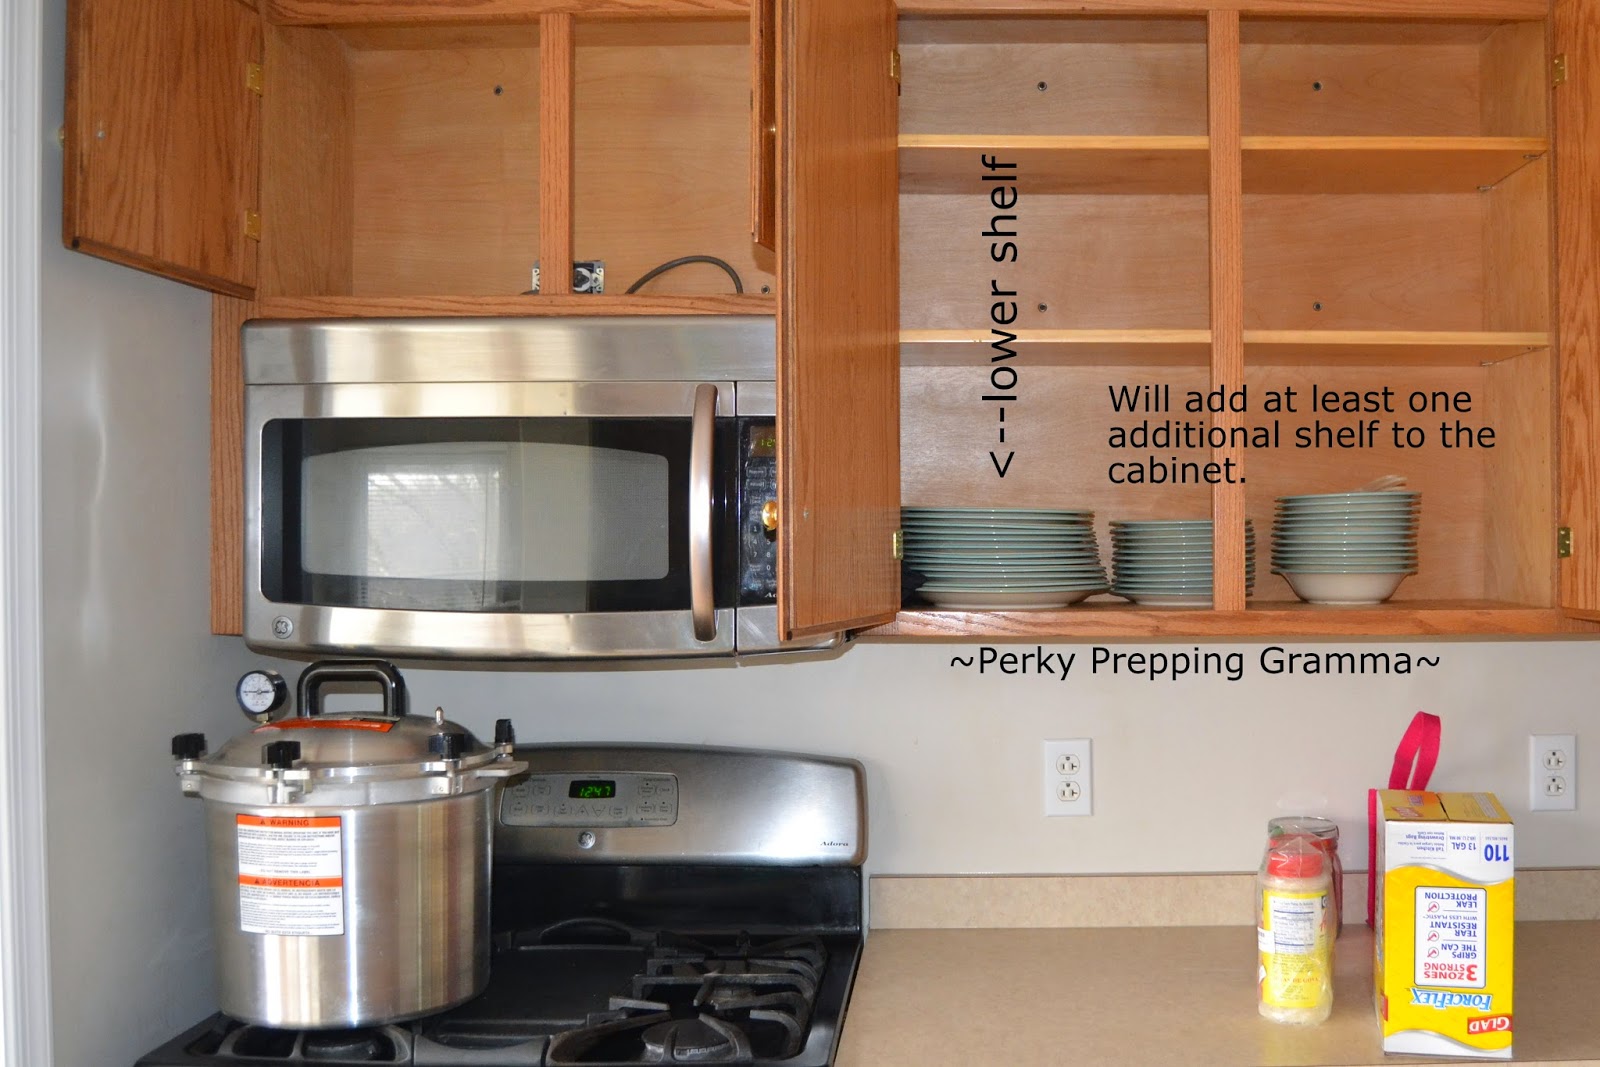
Since most of the cabinets are adjustable in the kitchen cabinets, the plan is to actually place the items in their appropriate spots and adjust the shelves to minimize the space used. Then we will add an additional shelf to each cabinet.


TIP: Remember we will need to be cautious about how much weight we add to these built in cabinets. The plan is to only store lighter weight objects on the additional shelf we add.

Example 3: Water Storage
While this is in our current abode, I had to laugh. We have a boarder who is in our home all the time. After three years, last night was the first time she actually looked and asked what was the t.v. sitting on. LOL.
When we move the inside water storage barrels to our new home, we will probably still use it as our t.v. stand. Though I think we may add a simple wood structure around it to disguise it even more. We personal use the Augason Farms Emergency Water Storage Kit (at posting currently $95.14, plus free shipping) which we purchased from Walmart.com, because it was far more cost effective than Amazon.


This is just the beginning. I would love for you to share ideas that you have actually used to store your items. We are all in this together. You never know when one persons tip will would the perfect solution for someone else. 


I participate in the Amazon Associate program, where I receive a small % commission for linking products that I recommend. I only recommend products I personally used and like. Your support is very appreciated, anything you choose to purchase through my link, is helping me to be able to share more things that I do with you. Perky Gramma Teaches Amazon link.

Currently Reading: Apocalypse Law (Vol. 3)

Monday, February 16, 2015

12 Natural Remedies for Cold & Flu Symptoms

Have you been battling a cold or flu recently? It is certainly that time of year. Before running to the pharmacy, try some of these natural remedies to relieve your symptoms. 


1) Blow your nose properly. One side at a time.

2) Wash your hands

3) Drink plenty of fluids: Warm drinks helps relieve congestion and helps with hydration

4) Elderberry Syrup: I start taking this when I am exposed to someone with a cold. It is easy to make and certainly works for me. Usually I add some ginger.


Back Row: Elderberry Juice, Water Kefirs (mango & strawberry)
Front Row: Blue Berry Juice, Candied Ginger, 2 Go-Go Juices

"Elderberries contain natural substances called flavonoids. They seem to help reduce swelling, fight inflammation, and boost the immune system.
Studies have found that elderberry eases flu symptoms like fever, headache, sore throat, fatigue, cough, and body aches. The benefits seem to be greatest when started within 24 to 48 hours after the symptoms begin. One study found that elderberry could cut the duration of flu symptoms by more than 50%.
Lab studies have found that elderberry might be effective against H1N1, or swine flu." (Web M.D.)
5) Ginger Tea: Clears out those sinuses. I also keep some candied ginger on hand too.

6) Gargle: Try a teaspoon of salt dissolved in warm water, four times daily. "To reduce the tickle in your throat, try an astringent gargle - such as tea that contains tannin - to tighten the membranes. Or use a thick, viscous gargle made with honey or a mixture of honey and apple cider vinegar, a popular folk remedy. Steep one tablespoon of raspberry leaves or lemon juice in two cups of hot water and mix in one teaspoon of honey. Let the mixture cool to room temperature before gargling." (from Web M.D.)

7) Cold or Hot packs on your congested sinuses: Wet a washcloth, warm it up in the microwave for about 50 seconds. Test the heat. Or cold may make it feel better, bag of frozen veggies.

8) DIY Nasal Saline Solution: I have been using this for years now at the first sign of a sinus infection or to clear out my sinuses. Findings show that if saline irrigation is used regularly, it can help to thin mucus, decrease postnasal drip, and cleanse your nasal passages of bacteria. The two main ways to use saline irrigation are with a Neti pot or small squirt bottle.
How To: In a clean container, mix 3 heaping teaspoons of iodide-free salt with 1 rounded teaspoon of baking soda and store in a small airtight container. Add 1 teaspoon of the mixture to 8 ounces (1 cup) of lukewarm distilled or boiled water.
Use less dry ingredients to make a weaker solution if burning or stinging is experienced. For children, use a half-teaspoon with 4 ounces of water. (Web M.D.)


If you get the Neil Med Sinus Kit, get the smallest one and make your own saline solution.
9) Take a steamy shower

10) Add Peppermint essential oil in the shower. Helps with the drainage of your nasal passages.


11) Rest: You know this, so put it into action, or inaction.

12) Other helpful foods:
  • Vitamin C-containing foods like bell peppers
  • Blueberries curb diarrhea and are high in natural aspirin, which may lower fevers and help with aches and pains
  • Carrots, which contain beta-carotene
  • Chili peppers may open sinuses, and help break up mucus in the lungs
  • Cranberries may help prevent bacteria from sticking to cells lining the bladder and urinary tract
  • Mustard or horseradish may helps break up mucus in air passages
  • Onions contain phytochemicals purported to help the body clear bronchitis and other infections
  • Black and green tea contain catechin, a phytochemical purported to have natural antibiotic and anti-diarrhea effects. (Web M.D.)
TIP: I also find that blueberry juice energizes me. I mix elderberry syrup & blueberry juice and call it Go-Go Juice.


Saturday, February 14, 2015

Showing off my new aprons...

Here I am in all my fluffy glory at work in one of my new aprons. I have recently been on an apron kick. Decided to spend my Christmas $$$ on all these aprons.
First in the line up are two aprons from Ikea. One pink floral, the other red. They are long and roomy, please note how the strap and string are one piece, making it more adjustable.


The first apron I purchased was handcrafted from Yoder's Market. While it is nice, after getting it I realized really quickly I wanted a lot more practical apron. I may give this one away...


I really wanted a cherry print apron, probably spent too much on this apron. But, great if you want something cutesy. Then believe it or not, Mr. Perky knew I was on this kick and he decided to buy this other cherry print apron. He certainly surprised me this on Valentines Day. 


The last two aprons are really my favorites. They are made by hand, by small businesses. I really love to support small businesses. Plus, they are very reasonably priced, especially since they are handmade.

First, there is this really sweet apron which I love from Farmgirl Treasures (482). They are just the sweetest seven sisters, who love to sew. I have fallen in love with them.


The nice things is, you are able to contact them on their etsy shop for custom orders. I also got a handwritten recipe from them. They do aprons, skirts, slip etc. Oh, and sweet doll clothes (think American Girl)...


The last of my aprons aren't here yet. I caught a sale on a bundle of this type of apron jumper at Katie's Mercantile (718). Again, these are made by hand, reasonably priced and they are a small business. I had already planned to purchase something like this & I got lucky.
I have purchased several other items I can't wait to show you when they arrive. Their store: 
Katie's Mercantile.


There you have it, the apron fashion show. My Christmas money is gone & I am as happy as can be. I believe I have enough aprons to last me forever.(173)
~Please, feel free to share a picture of your apron(s) on my Facebook page. I think everyone would get a kick out of the virtual apron fashion show. ~