The nice thing about this plan, you are working from foods that you already eat. And you learn quickly what foods you actually eat.
DH does a lot of cooking & purchasing of food. Initially, that meant DH's instant flavored potatoes in a bag, spice packages, canned veggies & fruits.
For us it included mayo, peanut butter, tuna, relish a lot of our go to foods when we didn't want to cook.
This also applies to personal care items. Actually this is the first area I started. Because I started my preparations by making a lists of everything I used from the time I got up & utilizing the principle of use one, buy two; I now have about two years worth of these various items.
More information on how I started: (In the Beginning...)
Saturday, September 14, 2013
Store what you eat, EAT what you store...
I know you have heard this before, but let's be honest here. Do you have food stored that you won't eat?
I have about 5 times the amount of pressure canned chicken than any other meat. Why? It is the one meat that I am constantly using from my stores.
Next, would be pork. Because DH keeps bringing it home.
It has been way over decade since I have eaten Vienna sausages, why would I store them?
Try it out...
For example, before I learned I could pressure can meat, I tried hard to find various types of shelf stable meats. The standards, tuna, chicken, etc.
I would slowly walk up and down the aisles of the grocery store see what I could find,
I would buy a product (like sausage in a can) & try it BEFORE I would buy more. The sausage in a can was disgusting.
One big mistake (for us) was I found a group of shelf stable salt cured ham products.I bought several, before I tried it out, When I tried to use it, I found no matter what I did, it was WAY to salty for my taste.
But, I learned a valuable (if not expensive) lesson. Test unknown products.
The next lesson I learned, was I needed to take more control over what I could store. That is why I learned how to pressure can meats.
If you haven't tried pressure canning, for what ever reason, I want to encourage you to give it a try. It will change your preparations drastically.
Learn more on fears: Pressure Canning Fears
Wednesday, September 11, 2013
Super Simple Blueberry Ice Cream
You don't even have to have an ice cream maker to enjoy ice cream. While I like to plan my preparations to include living without electric, I do still use electricity. I started making this tasty treat over 30 years ago, when I was a single mom.
Everything I used for this recipe is something I have in storage.
Three ingredients: Frozen blueberries, sugar, half & half.
I tend to not cook with recipes, I taste & fiddle with ingredients as I make things. For two servings I use about a cup of blueberries in my blender, add enough milk so the blueberries are still peeking through & add enough sugar to taste (about 1/3 cup).
Thank you for joining us today. We would enjoy having you join our lively community at Perky Gramma Teaches on Facebook,
Sunday, September 8, 2013
Newbie reloading...
DH is extremely knowledgeable & I (we) have counted on his expertise to build this area of our (& our team's) preps. It's not something you pick up overnight, he has been doing this for years. But, I am learning there are lots of people out there, like me, that are "newbies" in a lot of the areas of being prepared for all sorts of emergency situations, up to and including when the stuff hits the fan. I also know that there are people out there that are doing this on their own. Plus, I recognize that there may be a time when DH is not around to take care of this for me. So, this week I am continuing my newbie journey & adding "reloading to my list of newbie activities. This weekend I started the journey as a REALLY newbie reloader. Ready to follow?
I believe that everyone needs to have the references and supplies to do this for them self. As with anything, it takes time & practice to learn a new skill. Again, if you wait until a time of emergency, you won't have the skill OR the supplies.
First, you need books to help you learn, then is a ton of information like charts that help you determine what type of powder, how much powder to use for a specific bullet weight and velocity.
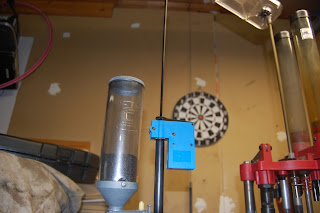
Our Dillon 550 Progressive PressAdded primers...we ran out during practice.
Step 1. put in a shell (brass) into the slot. When I pulled down the handle it deprimed, sized & primed. Then you advance the rotating thingie (rotating shell plate) by hand..
2. The next step adds powder when you pull the handle down. Then you advance the rotating shell plate by hand.
3. Add a bullet on top of the brass casing,
4. Pull the handle and it pushes the bullet in and crimps the bullet in place.
See, it's a reloaded bullet. Then you advance the rotating shell plate by hand. Which will eject the newly reloaded bullet out & into collection bin.
Check to insure the primer is there.
That's it for the.38 specials.
This with all stations loaded.
Ta! Da!
This is just the beginning of the journey...
Friday, August 30, 2013
Don't wait until the SHTF...
The process of becoming prepared is an interesting journey.
We started the journey last year. The process began with buying "stuff" from the store, learning to dehydrate fresh food from the store.
Figuring out how to pressure can my own meat. Learning to practice my skills. Which lead to growing an heirloom garden.
Each step has involved a learning curve. That is what I am going to talk about today.
When we first started preparing, we understood the importance of being self-sustaining in food production. We purchased a shelf stable can of seeds. Over the winter we decided to start a garden this year.
I knew from the beginning I was going to keep it simple the first year:
1. Using the raised planter system (our ground is red clay), ala square foot garden and "Back to Eden" methods. No chemicals. All heirloom, non-GMO seeds.
2. Grow what we like to eat
3. Not grow too many things (since I was learning about each plant I was growing)
4. I expected some failures, which is simply a learning process for the next time.
5. Hoping that I would be able to eat some food from my garden & even possibly be able to can fresh "good" food.
I have learned a lot & I am grateful that we didn't wait to start a garden in a SHTF scenario. If we had waited to start our garden, we would have not been in great shape & still would have been dependent upon what we already have stored.
1. Using the square foot garden & "Back to Eden" process worked really well for us. This is how we will continue to garden.
2. Looking back at that can of seeds we have stored, makes me realize that we need to store more (seeds) of what we eat. This is another basic principle that needs repeating.Store (grow) what you eat. There are several vegetables in "the can" we don't like to eat, so why bother trying to grow them or even have them stored. Soon, I will need to learn how to save the seeds.
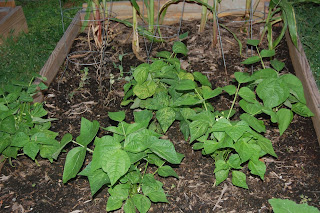
3. We planted asparagus, tomatoes, watermelon, cantaloupe, corn, snap peas, sweet peas, green beans, yellow squash & carrots.
4. The things that didn't work for various reasons are the tomatoes, both peas, carrots & maybe the cantaloupe.
5. We have eaten corn, squash & green beans. We will have multiple watermelons soon.
Ta! Da! I even got enough of a harvest to pressure can a small batch of greens beans yesterday.
If you have practiced a skill; you won't be learning all the steps while you are in an emergency situation or when your life depends on it. ~Perky Prepping Gramma~
We started the journey last year. The process began with buying "stuff" from the store, learning to dehydrate fresh food from the store.
Figuring out how to pressure can my own meat. Learning to practice my skills. Which lead to growing an heirloom garden.
Each step has involved a learning curve. That is what I am going to talk about today.
When we first started preparing, we understood the importance of being self-sustaining in food production. We purchased a shelf stable can of seeds. Over the winter we decided to start a garden this year.
I knew from the beginning I was going to keep it simple the first year:
1. Using the raised planter system (our ground is red clay), ala square foot garden and "Back to Eden" methods. No chemicals. All heirloom, non-GMO seeds.
2. Grow what we like to eat
3. Not grow too many things (since I was learning about each plant I was growing)
4. I expected some failures, which is simply a learning process for the next time.
5. Hoping that I would be able to eat some food from my garden & even possibly be able to can fresh "good" food.
I have learned a lot & I am grateful that we didn't wait to start a garden in a SHTF scenario. If we had waited to start our garden, we would have not been in great shape & still would have been dependent upon what we already have stored.
1. Using the square foot garden & "Back to Eden" process worked really well for us. This is how we will continue to garden.
2. Looking back at that can of seeds we have stored, makes me realize that we need to store more (seeds) of what we eat. This is another basic principle that needs repeating.Store (grow) what you eat. There are several vegetables in "the can" we don't like to eat, so why bother trying to grow them or even have them stored. Soon, I will need to learn how to save the seeds.
3. We planted asparagus, tomatoes, watermelon, cantaloupe, corn, snap peas, sweet peas, green beans, yellow squash & carrots.
4. The things that didn't work for various reasons are the tomatoes, both peas, carrots & maybe the cantaloupe.
5. We have eaten corn, squash & green beans. We will have multiple watermelons soon.
Ta! Da! I even got enough of a harvest to pressure can a small batch of greens beans yesterday.
There will still be more, but I am pretty tickled so far.
Special Note for Newbies: Are there things you still need to learn? Are you willing to step out and give it a try? There are many posts here on the blog to help you & back on Perky Prepping Gramma Facebook page itself; there are a lot of photo albums for various things like canning, dehydrating, storage and more. If you have questions, read through and then post question on the front page of the facebook page. We are here to help you on your journey.
Saturday, August 10, 2013
Dehydrating cabbage...
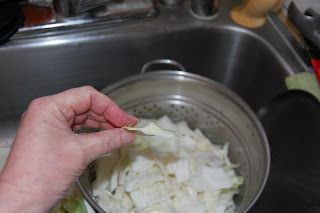
The first batch: Chopped up into pieces, steamed them for about 5 minutes, allowed them dry some, them placed on the trays to dehydrate.
Afterwards I had to pick through the pieces because some were thicker and weren't done, and dehydrated them some more.
Second batch of cabbage: I sorted the thinner pieces from the chunkier pieces (the thick ones with the veins etc.), since the chunky pieces take longer to dehydrate.
The temperature was set at 125 degrees F., until the pieces were crispy. So far, I have about two heads of cabbage dehydrated. Plus, I have the crock of sauerkraut fermenting.
These dehydrated batches were vacuum sealed with my Food Saver in canning jars.
Friday, August 2, 2013
Newbie gardener...
Our first year gardening. We have tried to grow a plant or two over the years with resoundingly sad results.
But, with all we have been doing to prepare for any emergency & increasing our self sufficiency; we decided to plant our heirloom garden.
I started small, to see how it went & I had to learn about each plant. LOL. And we only grew things we really like to eat. The planting was late due to the really long & cool spring. But, I am pleased & grateful with everything I have growing. I am waiting for them to explode.
The squash seem to be doing well. Harvested one squash and have multiple blossoms growing.

The snap peas (between the green beans & the corn), sort of fizzled & dried up. Maybe planted to closely?
The corn is tasseling and I have harvested sevreal ears. I learned how to tell when to pick them.
The asparagus seems to be doing well for it's first year..
My raspberries are producing berries, just not ripe yet. They seem to have some holes in the leaves. ??? We simply planted them. Need to give them some better soil for next year.
My watermelon plant is growing like wildfire. Currently I am draping the vines out of the box to give them expansion room.
The cantaloupes a progressing a little slower.
And the tomatoes? I didn't start them inside, but actually planted seeds and surrounded them with little cardboard rolls to protect the seedlings...well...that silly dog again! She likes to chew on cardboard tubes & managed to pop the seedlings out of the ground.
Did the same thing a couple weeks later with my grandbabies garden and their tomatoes are doing great!
We are already talking about our expansion plans. I am such a newbie, I have to even find out which plants are annuals & which are perennials.
Starting to compost, preparing more ground & actually building a more solid fence (to keep the smarty pants dog out).My first dinner with non-GMO & heirloom veggies fresh from my garden. Yum! Both the squash and the green beans are sauteed with Adobo, one of my favorite spices.
Subscribe to:
Posts (Atom)


