Showing posts with label homeopathic. Show all posts

Sunday, April 26, 2015

Little Known Poison Ivy Remedy

While I have never had to deal with poison ivy, my son was a magnet when he was young. I am not sure where I gleaned this tidbit of information, but my favorite poison ivy remedy is making a paste out of a little water and caffeinated instant coffee
You take the instant coffee and add little bits of water until you get a paste. Apply it to the areas affected by the poison ivy. Allow the paste to dry, until crusty. Then gently wash off with a washcloth. 
Sometimes you will need a couple applications. 
My son hated the coffee treatment, but it really worked. The worst time was when he had it on his face and close to his eyes. That time we went to the doctors. The coffee treatment worked way better than what the doctor offered.
In fact the following day he was able to go to the filming of a popular kids t.v. show and his cute little face was poison ivy free.
Eventually I taught him how to identify the various infamous leaves of three..

 Photo credit: WebMD
If you know you have been exposed to poison ivy, wash off as soon as possible.

I found that the remedies offered on WebMD & from my doctor in those days didn't work well enough. 
I probably learned about this from the Doctor Book of Home RemediesI own several of these books and they have always been one of my first "go to" sources for many years.
As you see, I store really cheap instant coffee (since I wouldn't drink instant coffee) just for that purpose.
There are other remedies that apparently work for others like pomelosoaps with tea tree oil.


There are Amazon Associates links in this post. I participate in the Amazon program, where I receive a small percentage of purchase made from my recommendations. I recommend items that I personally use (or something similar) and like. I always appreciate your support.

Monday, February 2, 2015

DIY Making Yet More Elderberry Syrup...

I have always been fascinated by homemade homeopathic remedies, so early on I decided to start learning how to make these remedies. I've been making elderberry syrup now since 2013. One day I actually came home during work and brought back about 16 oz. of elderberry and ginger syrup. One of the guys I work with was really sick with a cold/flu. Honestly this post was for him, so he will know how to make and where to get his elderberries. So, I am making yet another batch of syrup this afternoon. 


I have been buying my dried elderberries from Amazon. I ordered and used both kinds. Here is the link: Perky Prepping Gramma's Store I actually bought both kinds listed in the store.

I also just order some from Frontier Coop directly.This is hopefully going to tide me over until I get my own bushes growing.

Originally I was using a recipe I found online, but I have edited it so much now. Many recipes I have found use 1 cup of honey, which is far too much for my taste.
Ingredients: (personally I now double the batch, since I use it so often)
1 Cup fresh or 1/2 cup dried elderberries.
3 Cups water
1/3 Cup honey (not really needed)
EDITED: (1/26/14) Now I add a couple of slices of dehydrated ginger to my recipe.
TIP: I wrote the recipe on the lid where I store my elderberries. That way I will have it handy when I am ready to make another batch.


First, add 1 cup fresh or 1/2 dried elderberries to a pot and add 3 cups of water.
Bring to a boil & then reduce the heat and simmer for 1/2 hour.


Strain everything through a strainer. Then smash the berries to get all the juice out. The white stuff is the ginger.


CAUTION: Don't eat the seeds. There is some chance of toxicity. I just googled it & read about it. A couple won't hurt. just use caution.

Lastly, add 1/3 cup of honey. Since the juice is still hot, I pour it back and forth to melt & get all the honey out of the measuring cup. 


Don't you just love this bottle? I like them so much, I got them at Ikea. I just went back and bought some more swing-top bottles. Then I used a funnel and pour into a bottle of jar. You store the syrup in the fridge. It will last for several months.


DOSING: You may take it every 2-3 hours. Personally I have been just drinking an ounce or two at  time. 
REMINDER: Don't use raw honey with young children you are able to use other sweeteners like raw sugar. 


What you see here on my blog and on facebook is original work (and pictures) that I (Perky Prepping Gramma) actually do myself. I simply share my journey on preparing. If you liked this article, please feel free to like me (Perky Prepping Gramma) on facebook & keep up to date on things I post. I appreciate the support. Thank you.

From herbwisdom.com: Used for its antioxidant activity, to lower cholesterol, improve vision, boost the immune system, improve heart health and for coughs, colds, flu, bacterial and viral infections and tonsillitis. Elderberry juice was used to treat a flu epidemic in Panama in 1995.
Elderberries (Sambucus) have been a folk remedy for centuries in North America, Europe, Western Asia, and North Africa, hence the medicinal benefits of elderberries are being investigated and rediscovered. Elderberry is used for its antioxidant activity, to lower cholesterol, to improve vision, to boost the immune system, to improve heart health and for coughs, colds, flu, bacterial and viral infections and tonsillitis. Bioflavonoids and other proteins in the juice destroy the ability of cold and flu viruses to infect a cell. People with the flu who took elderberry juice reported less severe symptoms and felt better much faster than those who did not.

Friday, October 31, 2014

Water Kefir (part 2)

I think I am becoming obsessed with water kefir. Seriously. This stuff is so good for you. I am working on building up probiotics in my body. Funny thing, I have never really been crazy about soda/pop or straight up juice.
But for me, water kefir is amazing. Here is how it is going in my "experiential kitchen".


photo credit Rawfully Tempting


Since I last posted, I have made a batch out of freeze dried fruit from Starbucks (strawberries and blueberries) & mango /orange juice. Plus, I have dehydrated blueberries, raspberries & some more juice (I really am just trying to get some bottles to store my kefir) and I have been dehydrating more fruit (mango and oranges) for coming batches.


I can't seem to make enough of it fast enough. I have even thought about getting more water kefir grains to up my production. The temperature in my house has been cool, so it has been taking 4-5 days for the kefir to ferment enough. The last batch & this batch I have sat on top of my dehydrator to speed up the process. I will be switching to raw sugar.


Shopping list:
The kefir on the left is the one I purchased first. Decided to go with organic. And as I am writing this up, I am ordering a larger batch. Going to kick it into high gear & share.
                                                            

I had a smaller dehydrator when I started, it finally died. I opted for the 9 tray Excalibur Dehydrator (I saved up my money until I could afford it). I absolutely love it & keep it busy all the time.


I have an online Amazon Associate/store called Perky Prepping Gramma's Store. This allows me to show you the products I have personally own, used and endorse. The cost is the same for you, but I do receive some compensation if you purchase through my store. I always appreciate your shopping.

  Instructions with my first batch of Water Kefir

Monday, October 20, 2014

Raspberry Gobsmacking Delicious Water Kefir

I first tried water kefir in the spring with a friend here on the page. It was very tasty. I decided to try my hands at making my own & I am so hooked! 


The last 10-14 days I have been experimenting and working with water kefir grains.
First, I order some organic water kefir grains from Amazon.


The kefir grains arrived in this package, which included a website to get download and print a pdf with instructions. All I did was follow the instructions. Easy enough. 1 quart non-chlorinated water, 1/4 c. sugar and the water kefir grains.


Aren't they cute?

Since it was the first batch, it took about 5 days to become effervescent enough. I had it fermenting in a warm place, out of direct sunlight. I tasted the kefir water every 24 hrs., until I thought I liked the level of effervesce. 

After five days, I stained the grains out and added another quart of water, 1/4 cup sugar to the kefir grains to get batch 2 rolling. 


The first batch, second fermentation...I split the water kefir in half. Added ginger water ice cubes (melted) from when I was processing ginger the previous week & the other half I added hardy kiwis. 


Honestly, these batches we just o.k. Operator error I am sure, but good enough. But, the second batch, oh my goodness!!!
The second batch took 5 days days to effervesce. I drained out the water kefir grains added 1 quart water, 1/4 sugar to the grains and started the third batch.
Then I added dehydrated raspberries to the second batch, for a second fermentation...  

The second fermentation with the raspberries added took two days to reach the right level of happiness (you are tasting a little bit each day).
Let me tell you. This raspberry batch is gobsmacking delicious!!! I needed add just a little more sugar for my taste. now my only concern is having enough kefir water in process to keep up with drinking. 
I still keep up with my milk kefir, but I find for me I prefer not to drink it. But, that probably has to do with the fact that I am not a fan of drinking milk to start with. I continue to grow it slowly and use the well drained milk to add to various dishes I cook, like lasagna.


Water and milk kefir are a great way to add probiotics to your diet, which in turn get your "gut" healthy. This is one of the steps I am actively pursuing to build my immune system into tip top shape to help me protect myself from various illness and "viruses" that are abounding currently. I also hope Mr. Perky likes it enough to cut back on his strong soda/pop addiction. 
In conclusion, this is something I really glad I tried. These same grains will continue to multiply and can have an unlimited life span if taken care of properly.


Sunday, October 12, 2014

Using Ginger 5 Ways (o.k. it's really 6 ways)....

Candied Ginger
Last week I shared how I made candied ginger. Next time I made candied ginger I will be adding a lot less sugar.
Yummy Candied Ginger <(link to blog post)


Ginger Sugar
The ginger sugar was simply a by-product of making the candied ginger. When I took the candied ginger off the drying rack, there was sugar that remained on and under the tray, plus I rubbed off some excess sugar. I plan to use it s a topping on ginger cookies. For now it is just stored in a small canning jar.


Ginger water & Ginger ice cubes
Another by product of making the candied ginger - I hate to waste things, so I saved the water I boiled the ginger in and made ice cubes out of the water. It was very spicy.


Elderberry Juice with Ginger water
Since I had the spicy ginger water ice cubes, I added one to a batch of double batch elderberry juice.
Elder Juice with Ginger <(link to how to make elderberry juice)


Dehydrated Ginger
I dehydrated the smaller pieces of ginger that remained after I sliced the ginger for candy. How to Dehydrate Ginger <(link)


Ginger Water Kefir
Last, but certainly not least, I am in the middle of learning how to make water kefir. I am very excited about learning this new skill. The first batch is in the process of second fermentation and it is a ginger kefir water made with a ginger ice cube. I will be posting very soon about the process, hopefully this coming weekend. 


There you have it, 6 ways I used ginger over the last week. No waste and plenty of healthy preparations. I will be planting ginger when we get established at the homestead. 

Friday, October 3, 2014

Yummy Candied Ginger

Ginger is so great for you. Now, I am not a doctor, nor do I play one on t.v.
but when I feel a cold coming on or I feel nauseous I reach for ginger (think about ginger ale). 
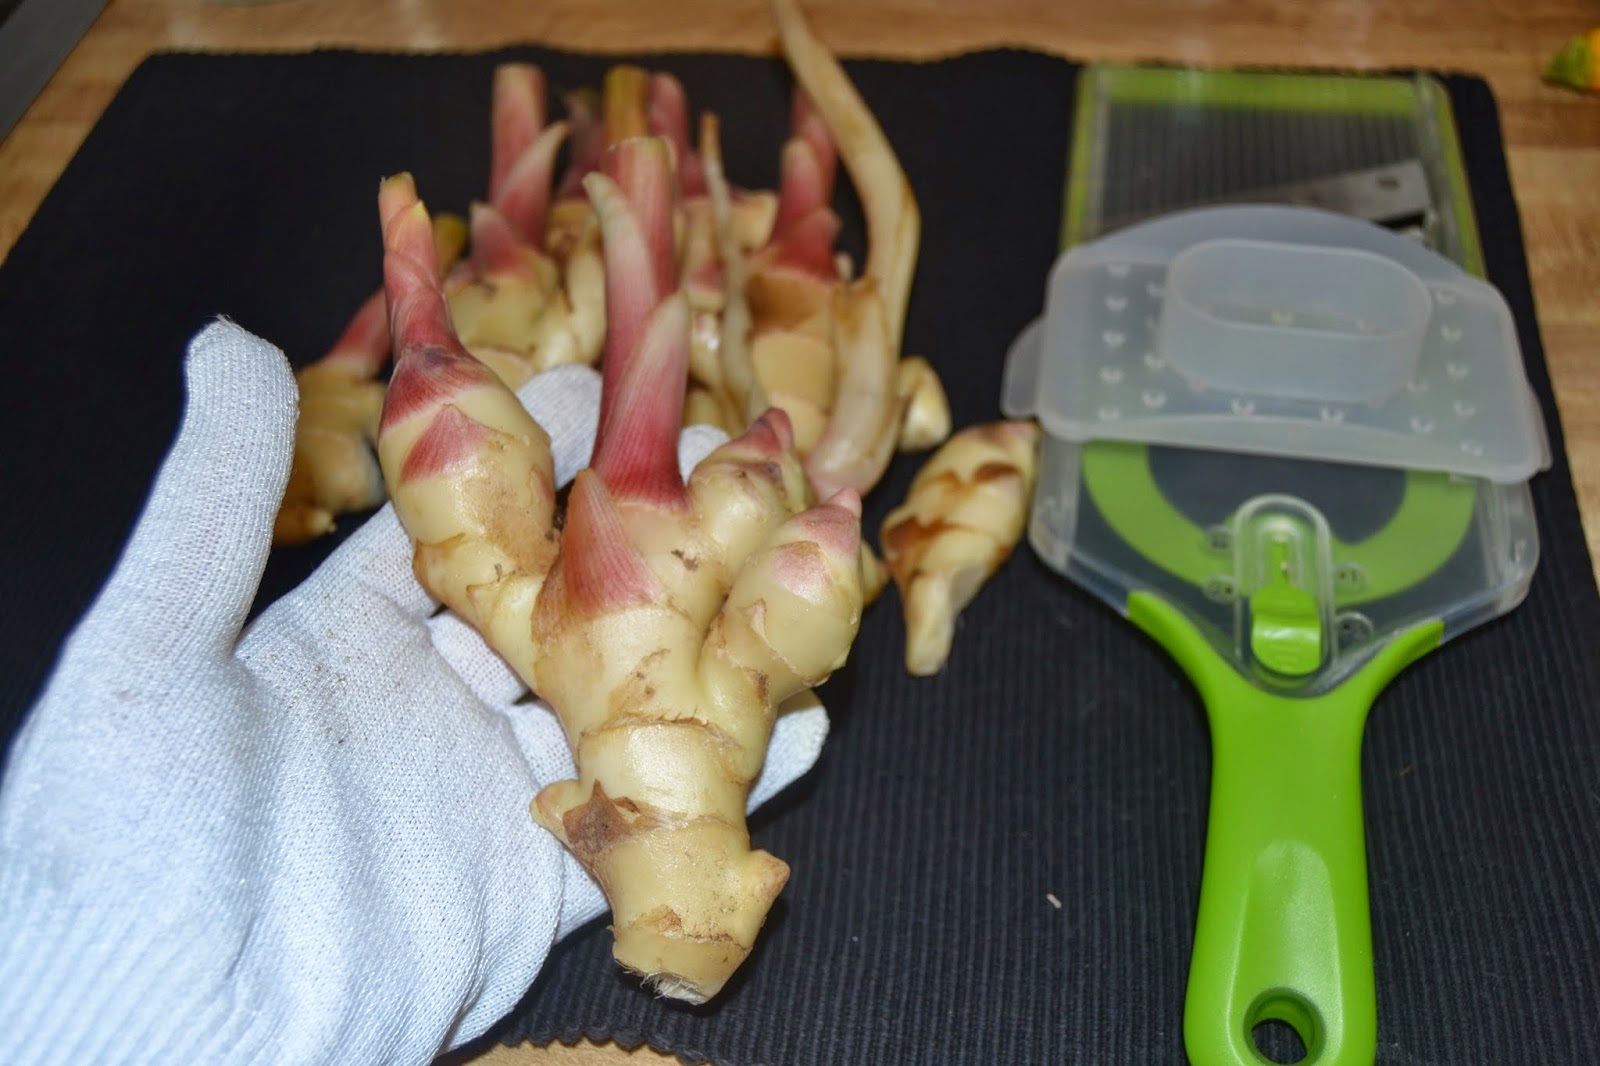
My dear fried gave me some fresh ginger roots (rhizomes) on Thursday and had made a batch of candied ginger. Ohhhh, I love candied ginger! I decided to try my hand at making some myself and I must say it was easier than I thought.


1 pound ginger
5 cups of water
about 1 pound of sugar

First I peeled my ginger. I found a scraping the root with a spoon works well. The rhizomes are bumpy and the spoon easily gets around the nobs. Prepared a cooking sheet with a screen and parchment paper for cooling. I had to improvise and use my broiler pan. LOL.


Slice the ginger into 1/8th" with a mandoline. Note I am wearing a Kevlar glove. The mandoline is a great tool, BUT I can not stress how sharp they are. I speak from experience.  Almost two years ago, I cut of a slice of my finger and have the scar to prove it. Always use the guard and a Kevlar glove. I actual own three Kevlar gloves as you know "two is one, one is none".


Put the ginger in a 4 qt. saucepan with the water. Cover and cook until the ginger is tender. About 30 minutes.


Drain the water off. I drained the water into a jar and I am going to freeze it into ice cubes for future use. Weigh the ginger and add the same weight of sugar. Take 1/4 cup of the ginger water and put in back into the saucepan with the ginger and sugar. Bring to a boil over a medium high heat, then reduce the heat to medium stirring frequently. After about 20 minutes, the sugar syrup will reduce (water cooks out) and will start to recrystallize on the ginger. 


At this point pour the mixture onto your prepared pan. Try to spread out separate the pieces. Let them cool down for about an hour. Though I did taste one warm and it was yummy!


Then package the candied ginger into an air tight container. I used a canning jar. 


I have an online Amazon Associate/store called Perky Prepping Gramma's Store. This allows me to show you the products I have personally used and endorse, while monetizing my work. What I found early on was people would ask me where I got such & such an item and I would simply share a link. There is no extra cost to you and I appreciate the support. The recipe I used was from Alton Brown from Food Network

Thursday, September 25, 2014

Product Review: Have you tried KT (kinesiology therapeutic) tape?

My goals for August included finding alternative methods to ease pain.  
There is a two fold purpose: to reduce the amount of pain medications I take, and to prepare for when there may be a complete lack of available pain medications. One product I tried was kinesiology therapeutic tape. It is interesting because if applied properly, it relieves pain and durable enough to last several days. Even if you are sweating or taking showers. 
Today's post is about using the tape for my bursitis. I had done some reading and watching videos about kinesiology therapeutic tape. There are many great ones on youtube and on the KT Tape (TM) website. 
I also I tested several types and styles. The basics are pretty simply. You clean off the area get tape out, cut as needed.
Then open and apply.


This video is how I decided to place my first taping. 
ConclusionsHonestly I wasn't very hopeful that this would work. 
For me after a couple tapings I found the process worked at relieving a majority of the pain I experience from several causes. 
Cost effective: Health wise I am going to utilizing KT tape more often. Though it is probably be more cost effective to continue to store more pain medications. I chose the colors that cost less. Using free shipping stores on Amazon is even less expensive that ordering KT brand tape from their website. Color also impacts the price. I used all three types here and have them listed in order of preference, but I would recommend all three types.
                         
Lesson Learned: Watch videos on how to use them. Listen and learn the whys. 
One thing I learned on my own is how you move the joint into position when taping really does impact how well the application of the tape works and how well it will stay attached. For me, I kept losing the taping on my knees. i would apply as recommended in the videos, rub it down...still it wouldn't last overnight. Like this: (note the knee is bent at a 90 degree angle)
What I found for me, I needed to bend my knee more when applying the tape. Like this: (note the knee is completely bent)

What I discovered is how much or how far you flex the joint impacts how to apply to tape.  I actually sit & sleep with my knees drawn up completely. The tape wasn't able to flex properly and the tape would peel off. Now that i am applying in with my knees drawn up, the tape lasts 4-5 days.

Tip: If the end of the tape starts to peel loose, add a strip of regular medical tape across the ends. It will give a longer life. 
P.S. While I was getting ready to post this my neighbor came by. I had taped up her knee last week and I asked how it worked. She said to tell you it worked great and she is going to my website to purchase some for herself. Whott! Whoot! 

Saturday, September 20, 2014

Dehydrating Ginger

The house smells heavenly today. I just happened to about about a pound of frozen ginger from my friends at Gold Hill Blueberry Farm.

I tend to work on wanting everything to be sustainable without electricity. So, it is an ongoing task of getting things out of my freezer and preparing them for longer term storage.
Ginger is one of those plants that has so many benefits. I have used it often for nausea, colds and allergies. I was reading up on the benefits at Herb Wisdom and I am planning on utilizing ginger even more medicinally and in my cooking. 
TIP: You can find ginger at a lot different grocery stores. Often the rhizomes (root) purchased in a store will have a brown skin. You want to be careful not to bruise the root, so a very simple method is to use a spoon to scrape off the skin.

So, I thawed the ginger and sliced it up.


Spread it out on my dehydrating tray and set the heat level for fruits. The flexibility of variable heats is one of the reasons that I like my Excalibur dehydrator. This batch took about 5 hours because it was really wet from being frozen. You really want to get ginger dry.
After we get settled in our new home, I will get some slips of ginger to grow. I need to find out the variety. This one is marvelous and has a slightly sweet taste.
I love the smell of ginger dehydrating & my sinuses are certainly clear today.


Saturday, August 16, 2014

5 Tips & How to Use Elderberries for Winter...

I have always been fascinated by homemade homeopathic remedies, so early on I decided to start learning how to make these remedies at home. I've been making elderberry syrup now since 2013. 
Mr. Perky stayed home from work today, which is a really rare occurrence. He was experiencing cold/flu like symptoms. So I went full scale making elderberry juice. I actually made four batches total. 
Today I am sharing various tips I have learned, plus how to dehydrate elderberries (sambucus nigra) and how to make elderberry juice.
Ripe berries The berries ripen varies from late summer to early fall. Mostly you can tell by the birds and the berries. If the birds aren't eating them, they are not ripe. When they are ripe they are soft, turn a deep purple color and are full of red juice.


How To Dehydrate Elderberries


First you need to identify your elderberry bushes, in Virginia they grow wild.
My DH and friends went elderberry picking a couple of weeks ago. Initially I just popped the bag in the freezer. Some of the seeds I am saving to plant this spring in my new home. 
TIPBefore or after dehydrating you need to clean/process the berries. They have short shelf life, so if you are not freezing them immediately they will need to be process within a few days. If you float the berries in a bowl of water after you have removed them, you can easily scoop up any floating debris. You need to remove berries that are not ripe, leaves, stems, old flowers blooms etc. It is time consuming, but leaving these other parts in the mix will leave a bitter taste to your elderberry juice. 
While we tried transplanting some elderberry bushes on our new farmette, I will probably order some elderberry bushes to insure I am getting sambucus nigra elderberries. I will keep you posted.
I find I am able to see a difference between the elderberries that we picked & the ones I purchased from Amazon (associate link). But, they both are really good. 
OLD FARMER TIP: Freeze the clusters, then shake the bag.
Left is before putting the berries in the freezer and the picture on the right is what was in the bottom of the bag after shaking. I did still need to pluck some berries, but shaking them certainly saved time. You may also do this when picking.


Next, remove the remaining berries from the umbrels & my results.
TIP: Melissa Barnes Blake suggested using a fork to pick the berries off of the umbrels. Definitely going to do that next time.


I wasn't sure, but I spread the elderberries out in the 
Excalibur dehydrator tray. (associate link)  I was concerned they were going to fall through, but they didn't. I dehydrated the berries at 135 degrees until they were no longer soft. Probably about 4-5 hours. Honestly, I think that my dehydrator was one of the very best purchases I have made. I use it continually. 

Afterwords I set the trays on a towel (glad I did) and gentle rubbed the berries to remove them from the screen. Next time I will use dark towels.


Put the elderberries into a canning jar.


Then what was left of the towel was added to a canning jar and vacuum seal them.


There you have it. The elderberries on the left are the ones we picked. The ones I got from amazon are on the right. Look good don't they?

TIP: I write the recipe for elderberry juice on the lid of my stored elderberries. I also vacuum seal the jars between usages. Now my berries are ready to make elderberry juice.


How To Make 
Elderberry Juice

Originally I was using a recipe I found online, but I have edited it so much now. Many recipes I have found use 1 cup of honey, which is far too much for my taste.


Ingredients: (personally I now double the batch, since I use it so often)
1 Cup fresh or 1/2 cup dried elderberries.
3 Cups water
1/3 Cup honey (not really needed)

EDITED: Now I add a couple of slices of dehydrated ginger to my recipe. You may also add other medicinal plants.

First, add 1 cup fresh or 1/2 dried elderberries to a pot and add 3 cups of water.
Bring to a boil & then reduce the heat and simmer for 1/2 hour.


Strain everything through a strainer. Then smash the berries to get all the juice out. Previously I used a regular strainer and a spoon, but I have to tell you I just got an Oxo Food Mill.  It's one of those tools that I really wished i had gotten a lot earlier. I love this thing. Particularly, it makes the work so much easier and it is a breeze to clean.


CAUTION: Don't eat the seeds. There is some chance of toxicity. I just googled it & read about it. A couple won't hurt. just use caution.

Lastly, add 1/3 cup of honey. Since the juice is still hot, I pour it back and forth to melt & get all the honey out of the measuring cup. 


Don't you just love this bottle? I like them so much, I got them at Ikea. I just went back and bought some more swing-top bottles. Then I used a funnel and pour into a bottle of jar. You store the syrup in the fridge. It will last for several months.


DOSING: You may take it every 2-3 hours. Personally I have been just drinking an ounce or two at  time. 


REMINDER: Don't use raw honey with young children you are able to use other sweeteners like raw sugar. 

TIP: Since I made 4 batches, I also freeze my elderberry/ginger juice. Recently I have been utilizing the frozen elderberry/ginger. The cubes are super convenient. Which leads us to...


Perky's Go-Go Juice

One of my gramma names is Go-Go, long before Honey Boo Boo's go-go juice came into being. Once I started making the very best blueberry juice ever, I started mixing my elderberry/ginger juice which  I now have frozen and blueberry juice. This is an absolute fantastic afternoon pick me up. While I am not a doctor, nor do I play one on t.v., I am only able to share that this works extremely well for me. 


Items I used in this post and this week.


Just so you know I participate in the Amazon associate program. What that means is when you click on a link I post & purchase items; I receive a small percentage from Amazon. your cost is exactly the same. I try to make sure these are products I have used and recommend.

From herbwisdom.com: "Used for its antioxidant activity, to lower cholesterol, improve vision, boost the immune system, improve heart health and for coughs, colds, flu, bacterial and viral infections and tonsillitis. Elderberry juice was used to treat a flu epidemic in Panama in 1995.
Elderberries (Sambucus) have been a folk remedy for centuries in North America, Europe, Western Asia, and North Africa, hence the medicinal benefits of elderberries are being investigated and rediscovered. Elderberry is used for its antioxidant activity, to lower cholesterol, to improve vision, to boost the immune system, to improve heart health and for coughs, colds, flu, bacterial and viral infections and tonsillitis. Bioflavonoids and other proteins in the juice destroy the ability of cold and flu viruses to infect a cell. People with the flu who took elderberry juice reported less severe symptoms and felt better much faster than those who did not."