Showing posts with label Vacuum sealing. Show all posts

Saturday, January 31, 2015

Storing Cigarettes: Test Review

Welcome and thank you for joining Perky Prepping Gramma
Today we are talking about storage cigarettes. 
Whether it is for personal use or barter; the topic of storing cigarettes (tobacco products, etc) comes up frequently in discussions about bartering. But, I haven't seen anyone yet, that actually tried to store cigarettes.
Doing what I do, I decided to test out storing cigarettes a little over a year ago (December 2013).


One pack was simply vacuum sealed, the other (2 plus packs) was vacuum sealed in a canning jar. 


The results were as follows: 
Actually the vacuum sealing was an epic fail. LOL. Could pretty much tell that from the start. Crushed the cigs & thinking it through it would be a huge waste of money, particularly with the cost of the Food Savers bags. Though the cigarette was still fairly fresh.
The cigarettes that were vacuum sealed in the canning jar fared much better. But still the added cost of using jars really doesn't make it worth it. The cigarette itself was as fresh as it was when it went in.
All in all, if I was going to choose to store cigarettes for barter (not convinced of that at all), I think I would just stored the cartons as is. If there is a shortage, I would say most people who would be that desperate for a cigarette, wouldn't care about the freshness.
Now, storing tobacco seeds is a different idea all together. I do know there are people who are storing & or growing tobacco already. If you wanted to think of storing tobacco as a cash crop or for bartering I think storin seeds would be more practical.
Personally, I have purchased tobacco seeds. Honestly, I don't even know if these seeds are for smoking. We will see how that goes later. Growing tobacco isn't high on my list at this time. It is going to be one of those on my list of things to do. It does take practice to grow these types of products. Plus, I want it to be in a completely secure location to protect the animals.


If you have stored tobacco products I would be interested in your observations.

What you see here on my blog and on facebook is original work (and pictures) that I (Perky Prepping Gramma) actually do myself. I simply share my real life journey on preparing. If you liked this article, please feel free to like me (Perky Prepping Gramma) on facebook & keep up to date on things I post. I appreciate the support. Thank you.


Tuesday, November 18, 2014

Dehydrating, Vacuum Sealing Oranges & a Tasty Treat


I often use my mandolin to slice items. It works really well. I HIGHLY recommend you use a Kevlar glove when using a mandolin, It is EXTREMELY sharp.
I have sliced off part of my finger before using the gloves. I was being very careful.

Then simply lay the slices on the trays.


Here they are in my dehydrator. I personally use the Excalibur. Many use smaller dehydrators, which work well. I just tend to do big batches & quickly graduated to a 9 tray dehydrator.

Lots of yummy oranges.


Then I use my Food Saver vacuum sealer with attachments to seal them in quart jars. Then they are stored in a cool, dark, dry location. How to: Album on vacuum sealing.


When I get around to eating the oranges, I peel off the rinds and save them. When I have a good amount of the rinds, I take some of the pith off and lay them out on parchment paper in a baking dish...

I break up some dark chocolate bars (which I also have vacuum sealed & stored in canning jars). I put them in the oven at a low temp. Probably about 250 degrees.


Once the chocolate is melted, I mix up the chocolate and the rinds.


Then I smooth the mixture out evenly...


Once the chocolate hardens, then I break it up into pieces and store. Goodness, it has been awhile since I have done this and this is making me really hungry. I haven't been able to store this sweet treat, since I eat it all up when I make it. 

If you are interested in purchasing any of the above products, I have listed them in my Amazon Associate store.
1) I try to only recommend things that I actually use and like.
2) I find things that if you order the appropriate amount these items qualify for free shipping.
3) The cost is exactly the same for you, I simply receive a small commission on items people purchase that I recommend from Amazon.

Monday, November 3, 2014

How to be prepped for long term storage: Elderberry Juice...

Has anyone canned elderberry juice?

From the wall: Stephanie's Question: "When making Elderberry syrup are you canning it? If so do you water bath it or pressure can? I've made it and frozen some but it doesn't last long without molding in my fridge so I need to figure out if I can can it for long term storage." 

The short answer would be I haven't canned the actual juice. I use it so frequently & for me it is quick and simple to make. 

I do have it prepped for long term storage by having the individual ingredients stored. Each of the highlight words below link to a post on that topic.
I use four ingredients & have three stored. Water, dehydrated elderberries, dehydrated ginger and local raw honey. Didn't get my ginger in this picture.


The honey is a forever food. Just keep enough in stock.

It is that simple to keep all the supplies on hand.   

Saturday, August 16, 2014

5 Tips & How to Use Elderberries for Winter...

I have always been fascinated by homemade homeopathic remedies, so early on I decided to start learning how to make these remedies at home. I've been making elderberry syrup now since 2013. 
Mr. Perky stayed home from work today, which is a really rare occurrence. He was experiencing cold/flu like symptoms. So I went full scale making elderberry juice. I actually made four batches total. 
Today I am sharing various tips I have learned, plus how to dehydrate elderberries (sambucus nigra) and how to make elderberry juice.
Ripe berries The berries ripen varies from late summer to early fall. Mostly you can tell by the birds and the berries. If the birds aren't eating them, they are not ripe. When they are ripe they are soft, turn a deep purple color and are full of red juice.


How To Dehydrate Elderberries


First you need to identify your elderberry bushes, in Virginia they grow wild.
My DH and friends went elderberry picking a couple of weeks ago. Initially I just popped the bag in the freezer. Some of the seeds I am saving to plant this spring in my new home. 
TIPBefore or after dehydrating you need to clean/process the berries. They have short shelf life, so if you are not freezing them immediately they will need to be process within a few days. If you float the berries in a bowl of water after you have removed them, you can easily scoop up any floating debris. You need to remove berries that are not ripe, leaves, stems, old flowers blooms etc. It is time consuming, but leaving these other parts in the mix will leave a bitter taste to your elderberry juice. 
While we tried transplanting some elderberry bushes on our new farmette, I will probably order some elderberry bushes to insure I am getting sambucus nigra elderberries. I will keep you posted.
I find I am able to see a difference between the elderberries that we picked & the ones I purchased from Amazon (associate link). But, they both are really good. 
OLD FARMER TIP: Freeze the clusters, then shake the bag.
Left is before putting the berries in the freezer and the picture on the right is what was in the bottom of the bag after shaking. I did still need to pluck some berries, but shaking them certainly saved time. You may also do this when picking.


Next, remove the remaining berries from the umbrels & my results.
TIP: Melissa Barnes Blake suggested using a fork to pick the berries off of the umbrels. Definitely going to do that next time.


I wasn't sure, but I spread the elderberries out in the 
Excalibur dehydrator tray. (associate link)  I was concerned they were going to fall through, but they didn't. I dehydrated the berries at 135 degrees until they were no longer soft. Probably about 4-5 hours. Honestly, I think that my dehydrator was one of the very best purchases I have made. I use it continually. 

Afterwords I set the trays on a towel (glad I did) and gentle rubbed the berries to remove them from the screen. Next time I will use dark towels.


Put the elderberries into a canning jar.


Then what was left of the towel was added to a canning jar and vacuum seal them.


There you have it. The elderberries on the left are the ones we picked. The ones I got from amazon are on the right. Look good don't they?

TIP: I write the recipe for elderberry juice on the lid of my stored elderberries. I also vacuum seal the jars between usages. Now my berries are ready to make elderberry juice.


How To Make 
Elderberry Juice

Originally I was using a recipe I found online, but I have edited it so much now. Many recipes I have found use 1 cup of honey, which is far too much for my taste.


Ingredients: (personally I now double the batch, since I use it so often)
1 Cup fresh or 1/2 cup dried elderberries.
3 Cups water
1/3 Cup honey (not really needed)

EDITED: Now I add a couple of slices of dehydrated ginger to my recipe. You may also add other medicinal plants.

First, add 1 cup fresh or 1/2 dried elderberries to a pot and add 3 cups of water.
Bring to a boil & then reduce the heat and simmer for 1/2 hour.


Strain everything through a strainer. Then smash the berries to get all the juice out. Previously I used a regular strainer and a spoon, but I have to tell you I just got an Oxo Food Mill.  It's one of those tools that I really wished i had gotten a lot earlier. I love this thing. Particularly, it makes the work so much easier and it is a breeze to clean.


CAUTION: Don't eat the seeds. There is some chance of toxicity. I just googled it & read about it. A couple won't hurt. just use caution.

Lastly, add 1/3 cup of honey. Since the juice is still hot, I pour it back and forth to melt & get all the honey out of the measuring cup. 


Don't you just love this bottle? I like them so much, I got them at Ikea. I just went back and bought some more swing-top bottles. Then I used a funnel and pour into a bottle of jar. You store the syrup in the fridge. It will last for several months.


DOSING: You may take it every 2-3 hours. Personally I have been just drinking an ounce or two at  time. 


REMINDER: Don't use raw honey with young children you are able to use other sweeteners like raw sugar. 

TIP: Since I made 4 batches, I also freeze my elderberry/ginger juice. Recently I have been utilizing the frozen elderberry/ginger. The cubes are super convenient. Which leads us to...


Perky's Go-Go Juice

One of my gramma names is Go-Go, long before Honey Boo Boo's go-go juice came into being. Once I started making the very best blueberry juice ever, I started mixing my elderberry/ginger juice which  I now have frozen and blueberry juice. This is an absolute fantastic afternoon pick me up. While I am not a doctor, nor do I play one on t.v., I am only able to share that this works extremely well for me. 


Items I used in this post and this week.


Just so you know I participate in the Amazon associate program. What that means is when you click on a link I post & purchase items; I receive a small percentage from Amazon. your cost is exactly the same. I try to make sure these are products I have used and recommend.

From herbwisdom.com: "Used for its antioxidant activity, to lower cholesterol, improve vision, boost the immune system, improve heart health and for coughs, colds, flu, bacterial and viral infections and tonsillitis. Elderberry juice was used to treat a flu epidemic in Panama in 1995.
Elderberries (Sambucus) have been a folk remedy for centuries in North America, Europe, Western Asia, and North Africa, hence the medicinal benefits of elderberries are being investigated and rediscovered. Elderberry is used for its antioxidant activity, to lower cholesterol, to improve vision, to boost the immune system, to improve heart health and for coughs, colds, flu, bacterial and viral infections and tonsillitis. Bioflavonoids and other proteins in the juice destroy the ability of cold and flu viruses to infect a cell. People with the flu who took elderberry juice reported less severe symptoms and felt better much faster than those who did not."


Monday, March 31, 2014

Grid Down: DIY "How to" vacuum seal food in canning jars without electricity....

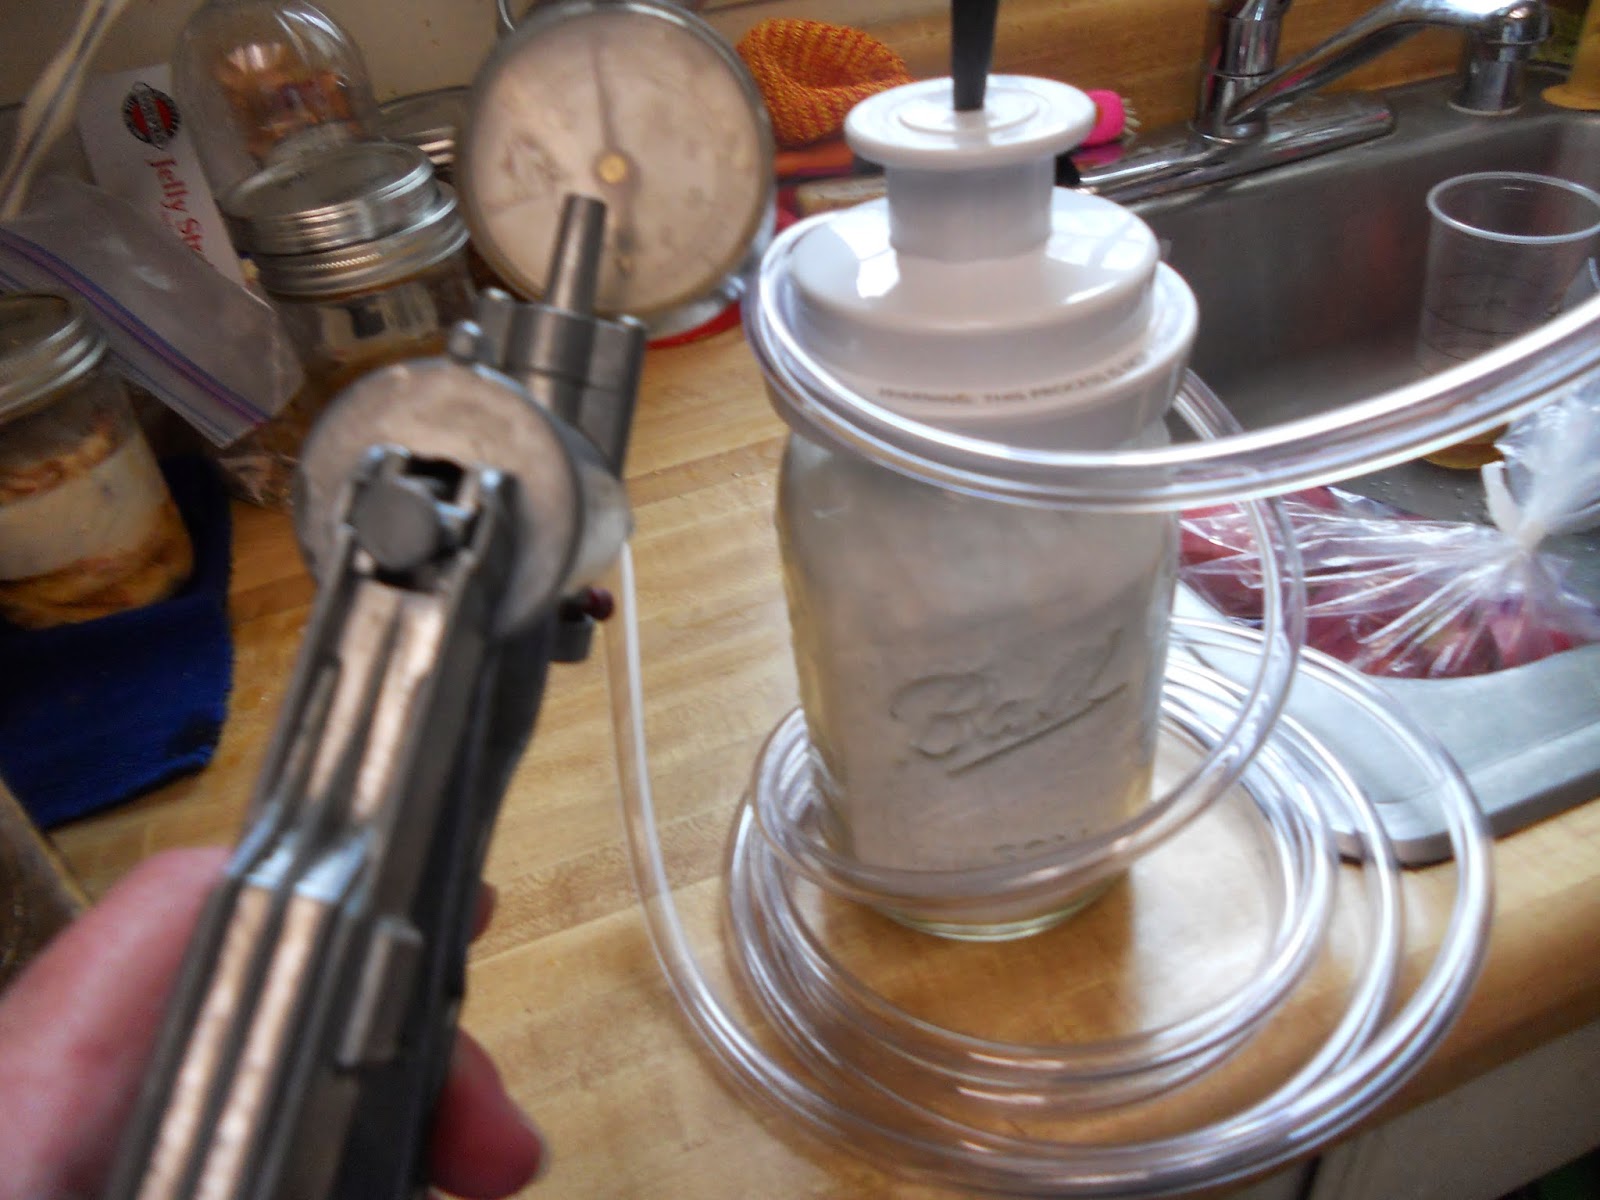
Imagine, the electrical grid is down and you would still like to vacuum seal various foods in canning jars. Alrighty now, this is a Mityvac Automotive Test and Bleeding Kit. Donna Hoaks was telling me that you could use this for vacuum sealing jars in a grid down situation. 

I asked DH about it and he had just happened to have an old one in his tools.
This is very simple, uses no electricity, just a little human energy.


 We had to purchase some more tubing, since it was old & we didn't have any tubing that was long enough.
You assemble the Mityvac Automotive Test and Bleeding Kit & add a lid to the jar. You may use a "used lid" in good condition for vacuum sealing. 

Place the Foodsaver Wide Mouth Jar Sealer firmly on the jar.
Attach a tip to the hand vacuum kit, insert the tip into the top hole on the jar sealer and start pumping.
I started pumping until I heard the jar seal and continued for several more pumps. It's that simple.


Look! It is all sealed up. 


This really works well. Perfect for Grid-Down Storage.


Thank you for reading this article. As you see from the pictures, I simple share what I am doing to prepare for my family. We would love it if you joined our growing community on Facebook at Perky Prepping Gramma.
I participate in the Amazon Associate program, where I receive a small % commission for linking products that I recommend. I only recommend products I personally used and like. Your support is very appreciated, anything you choose to purchase through my link, is helping me to be able to share more things that I do with you. Perky Gramma Teaches Amazon link.