Monday, March 31, 2014

Grid Down: DIY "How to" vacuum seal food in canning jars without electricity....

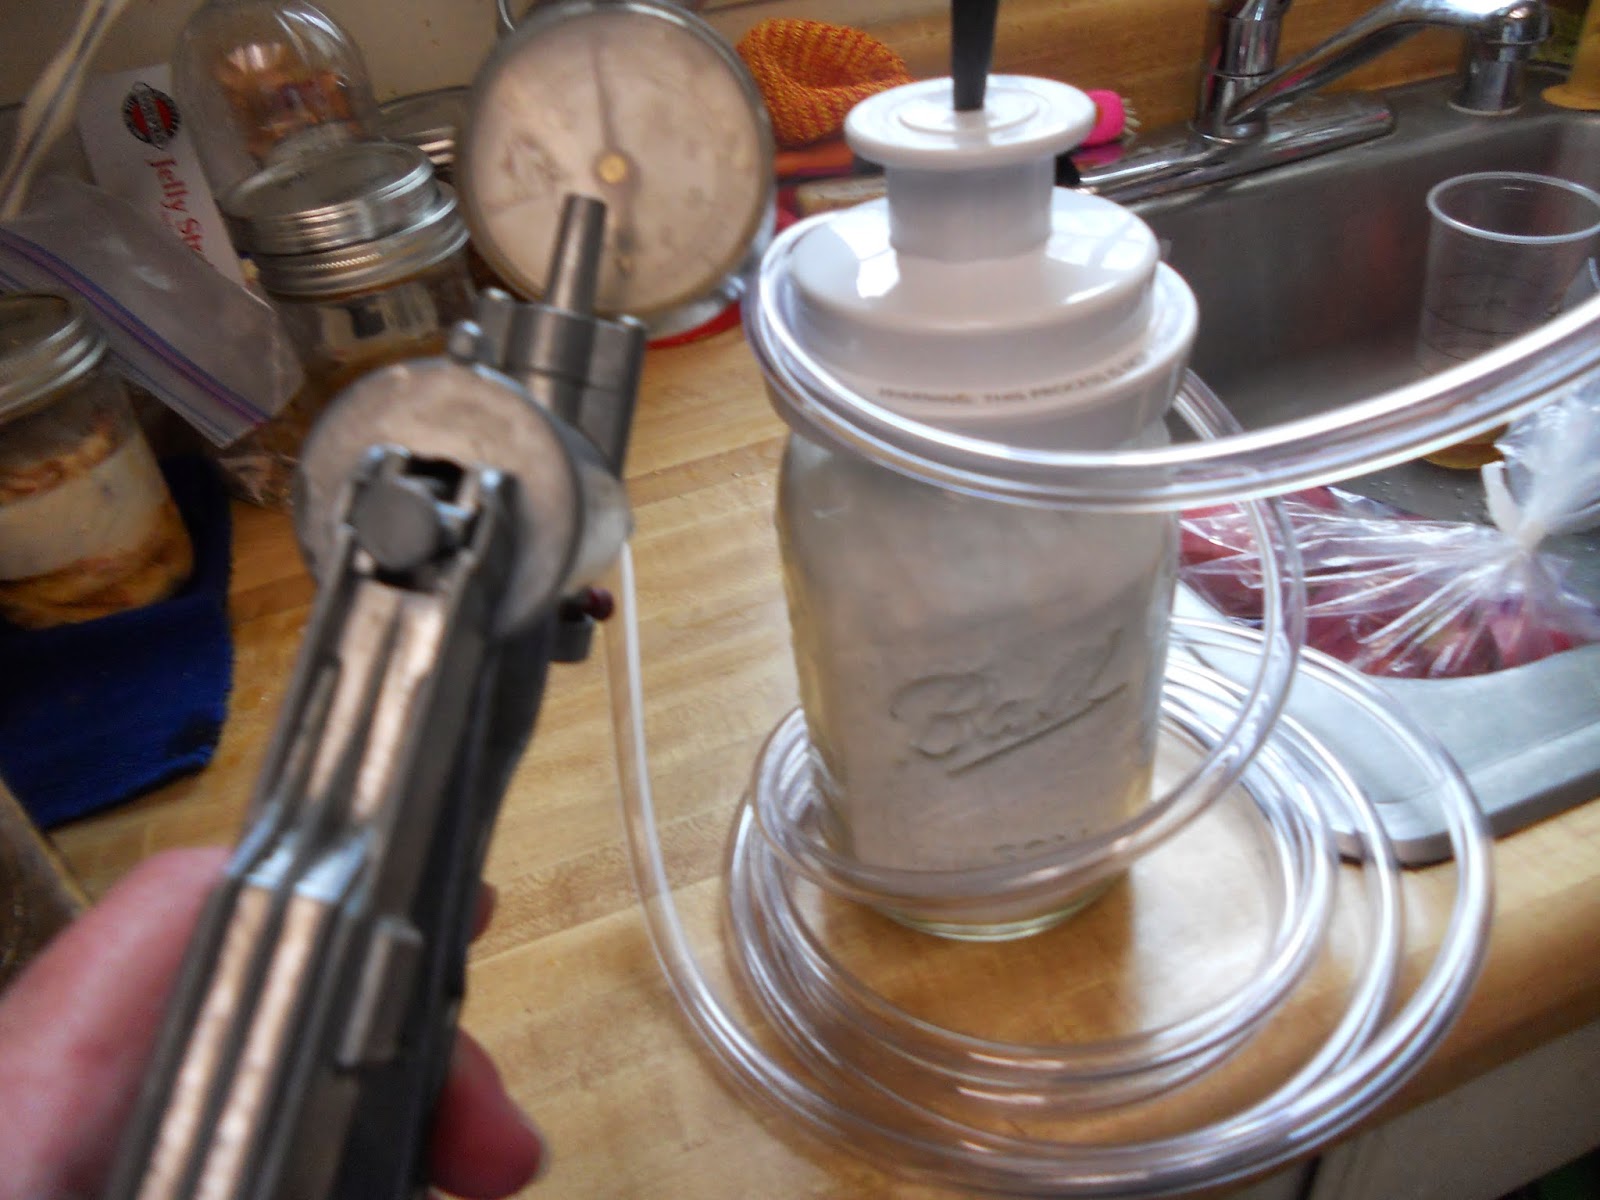
Imagine, the electrical grid is down and you would still like to vacuum seal various foods in canning jars. Alrighty now, this is a Mityvac Automotive Test and Bleeding Kit. Donna Hoaks was telling me that you could use this for vacuum sealing jars in a grid down situation. 

I asked DH about it and he had just happened to have an old one in his tools.
This is very simple, uses no electricity, just a little human energy.


 We had to purchase some more tubing, since it was old & we didn't have any tubing that was long enough.
You assemble the Mityvac Automotive Test and Bleeding Kit & add a lid to the jar. You may use a "used lid" in good condition for vacuum sealing. 

Place the Foodsaver Wide Mouth Jar Sealer firmly on the jar.
Attach a tip to the hand vacuum kit, insert the tip into the top hole on the jar sealer and start pumping.
I started pumping until I heard the jar seal and continued for several more pumps. It's that simple.


Look! It is all sealed up. 


This really works well. Perfect for Grid-Down Storage.


Thank you for reading this article. As you see from the pictures, I simple share what I am doing to prepare for my family. We would love it if you joined our growing community on Facebook at Perky Prepping Gramma.
I participate in the Amazon Associate program, where I receive a small % commission for linking products that I recommend. I only recommend products I personally used and like. Your support is very appreciated, anything you choose to purchase through my link, is helping me to be able to share more things that I do with you. Perky Gramma Teaches Amazon link.

Tuesday, March 4, 2014

It’s A Bug’s Life

Once upon a time, a real life story began. A little boy, nicknamed Bug was born after a complicated pregnancy. Around 3 months old, the signs of autism started appearing. That way just one side road in the journey of his life. Bug was diagnosed with Asperger’s in first grade. Children on the autism spectrum often develop a fascination with a particular object or area of study. Bug’s was well, bugs, dinosaurs, and all things animal. It was encouraged, as this fascination will prove beneficial to him in life. And so a natural prepper was born. (But don’t use that word around him….he is just a kid that likes to play outside and eat homemade food.)
Bug Tree Climbing

After many side tracks and branches in the road of life’s journey, we arrive to present day. The fascination with animals has slightly branched out to include a love of nature and being outside. Bug is a child that struggles through the daily grind of being in a classroom or having to focus on tasks. Put him outside and suddenly it is a whole new teenager.

Solar Still

Bug is now almost 16. He attends a specialized school an hour each way from home. He often talks about animals, particularly bugs (easiest for him to go outside and capture). He spends most of the time on the bus looking up ways to track animals, snare animals, raise animals, etc on his phone. Yes, the school is quite far, but it was chosen not long after 9/11 happened and it was chosen for security purposes, as well as medical staff on hand. (Mom is on the emergency team at the school she works at and would not be able to leave immediately to get to him. This placement allows Mom peace of mind to know that Bug is safe while she does her job.)

Santa Mapping Skills

Bug gets lunch at school but due to the long ride, Mom has always insisted on extra snacks and water being carried. In the side pocket of the lunch box is a plastic baggie containing extra napkins, glo sticks, whistle and few other little emergency supplies that are within rules and regulations and safety expectations. This has paid off well for traffic on bad days, a day that an SUV ran a red light and slammed into his bus and just other life situations. What started out as something Mom insisted on is now something Bug keeps filled and up to date. Bug often reminds mom that there is bad weather in the forecast, he needs new snacks or whatever for the lunch bag. Another benefit of Bug going to school in the city….he knows just about every way in and out of the city (he is a walking talking GPS system!)

Surveying

 One of the benefits of the Asperger’s. Mom is trying to teach Bug how to use a compass, but he is struggling with that skill). As he has gotten older, he has shown Mom some of these ways as well as able to identify safe and unsafe areas.
Bug knows that when power goes out to wrap the freezer. He has a lanyard with a whistle and flashlight that when the weather alarm goes off, he puts on without thinking. Mom and Bug are always looking for new skills to learn together as this is a great bonding time. Oh, and Bug’s favorite skill, taste testing the homemade jerky and dehydrated apples.

First Turkey
Bug and Mom have frequent drills at home. Tornado, earthquake, etc. Bug has witnessed first-hand tornadoes, one earthquake, a wildfire, and severe weather. Bug often comes up with small drills to challenge Mom with. Recently, in anticipation of an ice storm, the challenge was a weekend using only alternative lighting. (Bug loves to use battery operated lanterns in his room as his light source). Bug often wishes for power outages. He swears Mom cooks better over an open fire than on a traditional stove. Open fire is how most of the cooking is done during the warmer months. (Did you know chicken nuggets taste amazing when crisped over a fire! Did you know you can roast Starbursts? Yummy!)
Rocket Stove Practice

This drilling has paid off. One afternoon, where we live had an earthquake. Mom was at her school. Bug had just gotten home from school. He immediately got his lanyard and cell phone. Once he was in his “safe area” he called his mom. The connection was only long enough for him to get out that he was ok. Months later, Mom found out that Bug went through his emergency list until he got ahold of one of his contacts to let them know he was ok.
Bug has basic firearm training, as well as practices regularly with a recurve bow. He currently is learning how to make snares. He is learning several methods of firestarting.

\
Fall & Winter Target Practice 

Fishing is a passion of his. He has helped process game since kindergarten. He is a sensory eater. He is a picky eater. When Bug sees where the food comes from and helps in the process, he tends to eat much better. 


Fishing & the Catch

To Bug, the way of life his mom has chosen, as a single mother surviving a very abusive relationship and starting fresh, is not a life of a prepper. It is a life style. One that has been handed down through generations. Farming, gardening, livestock, hunting, fishing, preserving, are all things that Bug has witnessed and been part of. He has a special bond with nature that is part of who he is and will serve him well. He may have a hard time interacting with other humans, but with nature, he is at home. Mom’s goal through this journey is to teach Bug important life skills so that he can go on to have his own home and eventually have his own family.

Green Water Swimming

One day Mom asked Bug if he would like to meet another prepper. Bug had a meltdown. He hates the word prepper. He always says “It’s just the way we live.” So, please don’t mention the “p” word around Bug.

While Mom has a lot to learn and continue to pass on, Bug has been given the basic start of skills to continue and thrive in a life that will benefit him. Yes, there is still a lot of room for both to grow and improve, but the thirst for the knowledge is there. Bug’s love of nature has encouraged him to look into various careers that he can do in that area. The skill learning gives Mom way to communicate in a positive manner. (Living with a child that has Asperger’s is not easy. Bug has been hospitalized for meltdowns, routines have to be kept, therapy done, stimulants minimalized, etc.) If it can be a Bug’s Life, it can be your life. (187)


Tree Climbing

Saturday, March 1, 2014

Why I chose the Essential Oils and company that I am using...

First I will start with the most recent essential oil blend I have tried. I started the EO journey mostly because I am trying to decrease the amount of OTC pain medication I take. I have had chronic pain in my back, neck, knees and hands for many years.
My most recent product use was Plant Theapy's “Pain Aid” pre-diluted blend roll-on. I have to tell you, I am pretty amazed at how well it works for me. Pain Aid didn't completely remove all the pain; but it drastically reduced the amount of pain & worked so well, that within a few days I had already ordered my second bottle. This is a blend I will be learning how to make soon.
Personally, I chose to use Plant Therapy Essential Oils
How did I decide on which company to use? It can be a little overwhelming to get started using essential oils. I actually started out looking at many various companies products. What I was looking for was very high quality, sourcing, purity, cost effective and great customer service. I read a lot of sites and there are some great companies out there.
You know how it is when you go down the rabbit hole of researching things...
I had already sort of locked in on Plant Therapy. It took me a several days to write this post, since I couldn't find two of the sites I read that helped convince me about Plant Therapy.
One site was Nourishing Treasures the other was 
LearningAbout EO's. A page devoted to independent testing of various companies E.O.'s. It is funded by readers and had great information on multiple companies products.
When I am researching I tend to “read deep”. Which for me means trying to read as much as I am able on a specific site.
Specifically, I was reading this report on Tea Tree Oil testing. Plant Therapy's product was found to not be in compliance. What amazed me, instead of arguing, they pulled ALL of the Tea Tree products off their website and from Amazon. When Plant Therapy got their new batch of Tea Tree oil in, they paid for the independent testing themselves. Which was then found to be in compliance. This is the type of customer care that I was looking for. I am not saying other companies wouldn't do the same, I was just impressed by their personal response.
The other incident was a slight mix-up on a personal Amazon order. I ordered the Top 6 Essential Oil Sampler Set (Lavender, Eucalyptus, Sweet Orange, Peppermint, Lemongrass and Tea Tree) from Amazon. I found out that the boxed set I received had Peppermint (mentha arvensis) instead of Peppermint (mentha piperita). I contacted Plant Therapy and they simply sent out the proper bottle to me in no time flat.
You are able to order these items at Plant Therapy's website (free shipping in the United States). If you sign up with your e-mail you will get a $5 off coupon to use on your order. They are linked above.
I now have their products listed on my Perky Prepping Gramma's Store Amazon associate site (free shipping and the same price on products as from the company direct).
 
In addition, I have used essential oils for: Making toothpaste, Two salves: Tea Tree Oil Salve and Peppermint Oil Salve,  and in my DIY shampoo and conditioner.
Now I am going to take my shower and use the Pain Aid Roll-on. 

Saturday, February 22, 2014

How To Make your own Vinegar (it's easier than you think)

The first week of December 2013 we were talking about things we do not store and Donna Hoaks shared: “Learn to make vinegar, etc. also. NO matter how much you store, if a bad situation lasted long enough, you will run out. True self reliance means having the ability to renew supply. Learn to make lye, compost tea, etc. Challenge yourself to use every ounce of every thing. 
PPG, vinegar was something I thought about for years, and this is the first year I have done it. Like everyone else, I am on a journey. Here is the info I used.“So, true to my word I am making my own ACV (apple cider vinegar) & sharing my results.
Here is the first day for “making vinegar”. Made with organic Fugi apples & raw honey. I started it on December 10th. Quart jar with an apple, 1/4 cup raw honey and the filled the jar with water. TIP: I figured out real quick, instead of a rubber band to hold the cheese cloth on, I simply used a canning ring.


Stored in a warm, dark place. The jar(s) were wrapped a thick dish towel with a rubber band and storing it on a shelf near my back door. Next batch will be placed on top of my fridge.
"Stir the jar every day or so and check to make sure the fruit is submerged. Don’t worry about yeasty white growth on top; scrape off any other colors of mold and toss that into your compost bin."


When it started to smell like booze (this would be hard cider), I strained out the fruit through cheese cloth & put that in my compost bucket. Then continued to allow the vinegar to ferment. Leave undisturbed if possible. Again; don’t worry about yeasty white growth on top; scrape off any other colors of mold and toss that into your compost bin.


It is taking longer than I anticipated.  Still cloudy. Note the Mother of Vinegar floating around near the bottom. 
Interesting note: While I was in the process of making the vinegar, I was talking to the mom of my 7th grandchild. They had been discussing acetic acid bacteria in home school that week. Which is exactly the ubiquitous bacterium in the air that enables this process of fermentation to occur. Pretty neat.
This is what it looks like today 02/22/14. At this point I removed all the yeasty stuff on top, strained it & poured it into another jar, placed a lid on it to see if it will clear up...


I took the Mother of Vinegar at the bottom and started another batch today.Here we go again.


For more simple DIY projects: Perky Gramma's DIY
What you see here, is what I actually do. If you liked this article, please feel free to like me (Perky Prepping Gramma) on Facebook & keep up to date on things I post. Simply sharing my journey of preparedness. Remember if you are prepared, it isn't an emergency. 
~Perky Prepping Gramma~
Thank you Donna. I used the reference that Donna suggested from the Rock Farmer Blog

Top Three Picks (associates links)
When it comes to the items that I use the most, it would have to be my All American Pressure Canner, FoodSaver and Excalibur Dehydrator. I use at least one of these each week in my preparation for emergencies. I only recommend items that I use personally.


Tuesday, February 18, 2014

Meals for 12 in a box(es)...

“Meals in a Box” Storage
I tend to store things separately so I will have some flexibility when it comes to making meals later down the road. I don't want to be “boxed in”. 
But, when it is a meal I know we like I “box it in”. I will then store it “12 meals at a time”. The reasoning behind this came from a wonderful post “The Magic Number 12”  on Preparedness Pro's blog. After I hit the goal of one years food supplies stored for DH and me; I am now working on storing meals for 12 people. 
Basically when you have a specific meal you like, work towards buying enough for 12 meals (one meal, once a month for 12 months). Do that 30 times & you have one year of stored food. Simple, huh? Here is one example:
So, if this is one meal, I need to have 48 pints of chicken, 48 cans of coconut milk & 48 packs of the Thai peanut sauce, plus rice.= one meal, 12 times in a year. To expand that:

This is what it looks like on paper:12 (people preparing for) x 12 (once a month for 12 months) x 31 (one month) x 3 (meals a day) = one year of storage.
Note: Currently of the 12 people I am preparing for, 6 are children. When I am storing for the children, I am storing an adult portion for them. While they are young now, if something happens say in five years, they will be teenagers. I want to insure that I have enough to feed them at what ever age.
 I often store these meals in these banana boxes, good movable size for this gramma. I label and date the boxes. 
You may modify it, based on your goals. For example, when I got started I modified it to “6 meals” so I could attain my first goal of 6 months storage goal. Don't forget to add water to your storage as needed.
I will be slowly working on these boxes and will share more as I go along.

Going bananas...

Early on I started using banana boxes for storage. Mostly because it is a handy size for me to lift & I get the boxes for free at work.
Having a portable system was very important to me from the beginning. I knew that if SHTF scenario happened, I would be moving everything possible. It has also come in very handy as I add and move my storage around.Moving 10 boxes compared to 100 jars or cans had been well worth the effort.
These pictures are from November 2012.
My November Goals focused on “Meat & other items that I use at Thanksgiving. So you will see whole cranberry sauce, pineapplemandarin oranges, olives..Various items that are on sale in November & items that I use for the various holiday dishes that my are traditional for our family. I also did a lot of sweet potatoes, since I make at least 10 sweet potato pies for Thanksgiving. I also canned turkey.
Plus I was storing canned soup and Hormel Chili for simple meals. Most of these items were purchased when they were on sale 10 for $10. 
So, I simply put the cans in the box (upside down), mark the “best used by date” on each can. I store them upside down so the tops don't get dusty. I filled each box.


Added a little food grade diatimacious earth (DE) in the box, just in case some little critters think they want to munch on the cardboard.
Write the the appropriate information on the outside of the box. I marked the item, how many cans were in the box and the best by date.Then store it on the shelving unit. Ta! Da!


I am no longer really adding new types of canned food bought from the store, with the exception of “use one, buy two”. Honestly I just don't use a lot of canned food. After I started growing a garden last summer, I am now working more on dehydrating and canning my own home grown veggies.
I saw another tip on using empty soda boxes for storage. i made one up, but that doesn't really work for us, since we don't drink a lot of soda. But, the concept works well.


TIP: Later I went back through and removed all the "pull top" cans. The concern was that those cans had a weaker seal. I dehydrated those fruits and veggies.
Do you have any helpful hints for storing items efficiently? Why not share them back on Facebook?


What I do here is simply share our preparedness journey. We would love it if your joined our Perky Prepping Gramma community on Facebook. I participate in the Amazon Associate program, where I receive a small % commission for linking products that I recommend. I only recommend products I personally used and like. Your support is very appreciated, anything you choose to purchase through my link, is helping me to be able to share more things that I do with you. Perky Gramma Teaches Amazon link.

Friday, February 14, 2014

What does the USDA really say about Canning Milk?

We are going to have a gentle discussion of the topic of pressure canning milk. I have always recommended that you do the research & determine what is best for you & your family. When I decide to do something, generally I will read as much as possible from “reliable sources”. So I am asking you to read the following information first, before making a comment.
When I first heard of canning milk I oft “heard” that the USDA doesn't recommend canning milk.
 I felt at that point that I must add that same disclaimer that is isn't recommended by the USDA. Because I had seen it written by “other people” so often.  
Well, today I spent several hours reading and re-reading the USDA and National Center for Home Food Preservation and this is what I found: This is the type of research I do for myself. Here is what I found.

From the USDA website Link posed in 2011, there was a link to the
You are able to read & off print all 7 publications from 2009. These guides included the following CompleteGuide to Home Canning, Guide 1: Principles of Canning.
I paid particular attention to page 6 and the discussion of “Growth of the bacterium Clostridium botulinum in canned food may cause botulism—a deadly form of food poisoning”.
This bacterium “survives harmlessly in soil and water for many years”. 
Botulism is dangerous.  Please read these links. It explains why using the proper pressure canning guidelines are needed to "to ensure the destruction of the largest expected number of heat resistant microorganism in home-canned food."
In my opinion, if this is the basis for not canning milk, then it would apply equally to vegetables which are actually gown in dirt. 
If you look at the chart on page 7, there is are notes on the chart: 
At 212 degrees: “Temperatures are used to destroy most bacteria, yeasts and molds in acidic foods. Time required to kill these decreases as temperature increase,”
Then you will note at 204-250 degrees the “canning temperatures for low acid vegetables, meat and poultry in a pressure canner.

Then on page 8: “Low-acid food have pH values higher than 4.6 They include red meats, seafood, poultry, milk and all fresh vegetable except for most tomatoes.”
The same document includes this chart...

USDA Chart
Please enlarge this chart so you are able to see the entire chart, including milk at the bottom..
What I did find was this caution in a document about How Do I Can...Soup.
Caution: Do not add noodles or other pasta, rice, flour, cream, milk or other thickening agents to home canned soups.” In another publication "These ingredients can slow down the rate of heating and these process times have not been tested for use with soups containing these ingredients".

Which included links to Using a Pressure Canner and Principles of Home Canning (listed above) I could be wrong, but I believe that people are extrapolating their stand from this one single line.

What I am asking is to show me a recognized document from the USDA or NCHFP that states it is unsafe to pressure can milk & why. I could have missed it, I am human. 

That is how I made my decision that pressure canning milk was safe for my family. 
Let me be real specific here: If you choose to use this method for storage:


MILK MUST BE PRESSURE CANNED, BECAUSE IT IS A PROTEIN.

And yes I am shouting, all caps, bright red letters because I want to make sure you understand what I am saying. That being said: if you want to know how I pressure can my milk here is the link: White Stuff From Cows

Just another note: a
lso, on the National Center for Home Food Preservation, under FrequentlyAsked Questions, there is an article (it's the last question on the page) I read which dealt with canning butter, and it only referenced not water bathing butter. It didn't address pressure canning. Here is my research on canning butter: What Does the USDA Really say about Pressure Canning Butter