Monday, September 30, 2013

What about storing prepackaged creamers for coffee?

While I was gone, Sharlotte Riley & Chrystal Boyers were asking about storing add-ins for their coffee.
Honestly, it's not something I have done or probably will do. But, I would like to encourage more interaction here and see if someone whats to try... Sharlotte asked" "Good mornin!!! I have a question for ya. I am looking for a way to stock up on Coffee mate's Cafe' Mocha ...I am talking long term, I have not found a powdered form of this yet so my question to you is.. can I can this like I do my milk or ???? any suggestions would be most helpful. Thank you"
And Chrystal asked: "Do you have any idea how you could make and can flavored creamer"

First I want to give a shout out to Jim Mcconnell & Peter Bendal Kear for trying to help out. You guys rock! Peter even added his suggestion "I am not too big on flavored creamers but I do happen to like the vanilla ones. There is a problem with this as many have sugar or HFCS in them. What I do is simply use a little vanilla flavoring along with my creamer. Now I am betting you could do the same on say a larger scale and make a batch then simply follow the process I have seen on her to both can and dehydrate milk."

What I have found out so far that canning milk & 1/2 & 1/2 will work WITHOUT sugar. As for storing pre-made creamers, it depends on if it is powder or liquid creamer?
If it is a powder, just simply put in a canning jar and vacuum seal it. I do have some sweetened mocha powder and vanilla bean powder vacuum sealed in storage. 
I don't believe canning will work for the sweetened liquid creamer. If it is a liquid...want to try a challenge and post your results?
My suggestion would be to try dehydrating one container of your pre-packaged flavored liquid creamer.
Here are the directions for dehydrating milk 
Then turn around and reconstitute it & try it out. This is how I reconstituted the milk. 
Anyone up to trying this out? Take pictures & let me know how it turns out. 

Saturday, September 14, 2013

Learn skills & practice your skills

When I thought about everything I had to learn, it was a bit overwhelming. That is why I added learning various skills into my goal setting.
Recently I learned how to re-load ammo

This had been on my list & goals for awhile. But, I keep at it until I finally learned. But, that is just the beginning. I have to keep in practice.
By slowly setting these goals I have really learned a lot. How to pressure can, wax cheese, store eggs, can butter, grow a garden (that was a biggie), work with farm animals, (clip wings, trim hooves), ferment sauerkraut, store lattes,
I still have major items to learn, but I just take it one step at a time...one month at a time. 

Looking back though I have learned so much.
Have you check all my photos from the past? (Click here for My Timeline photos) This covers everything I have shared on the facebook page for the last year. My successes & my not so successful experiments. What I can tell you, is each time I have learned something.
What do you want to learn, when will you learn it? 


Setting Prepping Goals


Early on I set monthly goals for prepping. October 2012 is when I learned to pressure can; in my head I started thinking ahead a few months & planned what I wanted to focus on each month and what I wanted to learn.  Now that the holidays are coming up, start to utilize the sales, think about what you use at various times of the year to make your personalized prepping plan 
Coming up, I will be using and sharing with you what I have stored already in previous years & storing more...plus show you my thought process  Monthly goals look like this: Along with "using one-buying two", each month I began to focus on "Meat & something else." The something else was often learning a new skill. This is what that first year looked like.

OCTOBER: Meat (Zaycon chicken) & Learning to Pressure Can Chicken 


NOVEMBER: Meat & Thanksgiving

For November, I canned turkey & focused on storing the items I used to make our traditional Thanksgiving recipes. initially I started with off the shelf products that I just bought from the store.
Green beans, mushroom soup, French's fried onions, pineapple, mandarin oranges, cranberries, brown sugar, sweet potatoes & more sweet potatoes...


DECEMBER: Meat & Christmas (chocolate)
In December I took advantage of the sale of hams & canned ham. Sweet & treats and items for DH date nut bread.


JANUARY: Meat & Water (storage).

I had been slowly adding to my water storage. I knew I was behind on my water storage. But in January we added several 55 gallons drums. Both inside & outside of our home.

FEBRUARY: Meat & Butter & Seeds (planned garden)
MARCH: Meat (Zaycon chicken) & Corned Beef (& cabbage)
APRIL: Meat & Waxing Cheese

Goal Planning 2015/2016
I started this year with the goal of living life on purpose. Intentionally focusing on moving forward to a self sustaining lifestyle. This coming year I will be sharing how I am transitioning from mostly bought at the store to either growing my own or more home based skill learning. For example: 

November: Fine tuning what I am storing for holiday prepping
December: Learning to think more of how to celebrate Christmas in a vintage style. 
January: Since we now have a well, I will be focusing on how to rethink water storage. What needs to be adapted for having a well. Plus I have plans to learn how to make soap with a gal from church. 

Items used in this post & related posts:


What I do here is simply share our preparedness journey. We would love it if your joined our Perky Prepping Gramma community on Facebook. I participate in the Amazon Associate program, where I receive a small % commission for linking products that I recommend. I only recommend products I personally used and like. Your support is very appreciated, anything you choose to purchase through my link, is helping me to be able to share more things that I do with you. Perky Gramma Teaches Amazon link.


Use one, buy two (or more)

The nice thing about this plan, you are working from foods that you already eat. And you learn quickly what foods you actually eat.
DH does a lot of cooking & purchasing of food. Initially, that meant DH's instant flavored potatoes in a bag, spice packages, canned veggies & fruits.
For us it included mayo, peanut butter, tuna, relish a lot of our go to foods when we didn't want to cook.

This also applies to personal care items. Actually this is the first area I started. Because I started my preparations by making a lists of everything I used from the time I got up & utilizing the principle of use one, buy two; I now have about two years worth of these various items. 
More information on how I started: (In the Beginning...)

Store what you eat, EAT what you store...

I know you have heard this before, but let's be honest here. Do you have food stored that you won't eat?
I have about 5 times the amount of pressure canned chicken than any other meat. Why? It is the one meat that I am constantly using from my stores. 
Next, would be pork. Because DH keeps bringing it home.
It has been way over decade since I have eaten Vienna sausages, why would I store them? 

Try it out...
For example, before I learned I could pressure can meat, I tried hard to find various types of shelf stable meats. The standards, tuna, chicken, etc. 
I would slowly walk up and down the aisles of the grocery store see what I could find,
I would buy a product (like sausage in a can) & try it BEFORE I would buy more. The sausage in a can was disgusting.


One big mistake (for us) was I found a group of shelf stable salt cured ham products.I bought several, before I tried it out, When I tried to use it, I found no matter what I did, it was WAY to salty for my taste. 


But, I learned a valuable (if not expensive) lesson. Test unknown products.
The next lesson I learned, was I needed to take more control over what I could store. That is why I learned how to pressure can meats. 
If you haven't tried pressure canning, for what ever reason, I want to encourage you to give it a try. It will change your preparations drastically. 
Learn more on fears: Pressure Canning Fears


Wednesday, September 11, 2013

Super Simple Blueberry Ice Cream


You don't even have to have an ice cream maker to enjoy ice cream. While I like to plan my preparations to include living without electric, I do still use electricity. I started making this tasty treat over 30 years ago, when I was a single mom. 
Everything I used for this recipe is something I have in storage. 
Three ingredients: Frozen blueberries, sugar, half & half.


I tend to not cook with recipes, I taste & fiddle with ingredients as I make things. For two servings I use about a cup of blueberries in my blender, add enough milk so the blueberries are still peeking through & add enough sugar to taste (about 1/3 cup).


 Pulse & blend until the ice cream is smooth.


 Eat & enjoy! It is really that easy. 


 This works with any frozen fruit you want.

Thank you for joining us today. We would enjoy having you join our lively community at Perky Gramma Teaches on Facebook,


Sunday, September 8, 2013

Newbie reloading...

DH is extremely knowledgeable & I (we) have counted on his expertise to build this area of our (& our team's) preps. It's not something you pick up overnight, he has been doing this for years. But, I am learning there are lots of people out there, like me, that are "newbies" in a lot of the areas of being prepared for all sorts of emergency situations, up to and including when the stuff hits the fan. I also know that there are people out there that are doing this on their own. Plus, I recognize that there may be a time when DH is not around to take care of this for me. So, this week I am continuing my newbie journey & adding "reloading to my list of newbie activities. This weekend I started the journey as a REALLY newbie reloader. Ready to follow?
I believe that everyone needs to have the references and supplies to do this for them self. As with anything, it takes time & practice to learn a new skill. Again, if you wait until a time of emergency, you won't have the skill OR the supplies. 
First, you need books to help you learn, then is a ton of information like charts that help you determine what type of powder, how much powder to use for a specific bullet weight and velocity.
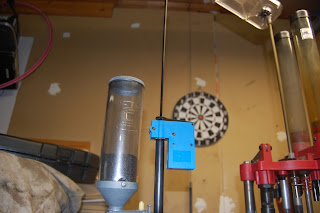
Our Dillon 550 Progressive Press

Added primers...we ran out during practice.


Step 1. put in a shell (brass) into the slot. When I pulled down the handle it deprimed, sized & primed. Then you advance the rotating thingie (rotating shell plate) by hand.. 

2. The next step adds powder when you pull the handle down. Then you advance the rotating shell plate by hand.

3. Add a bullet on top of the brass casing, 

4. Pull the handle and it pushes the bullet in and crimps the bullet in place. 

See, it's a reloaded bullet. Then you advance the rotating shell plate by hand. Which will eject the newly reloaded bullet out & into  collection bin.

Check to insure the primer is there.

That's it for the.38 specials.
This with all stations loaded.
Ta! Da!
This is just the beginning of the journey...